5 Essential Tips for Choosing the Best Air Conditioning Camper for Your Travels
Introduction
Shopping for “air conditioning camper” equipment becomes easier when you start with the trip rather than the appliance. Where will you park, when do you want cooling, what power will be available and where can the equipment fit? Those answers narrow the choices more effectively than the largest capacity number in a listing.
For my Ford Transit build, I bought an UndermountAC 12V system with a ducted evaporator. That purchase connects cooling with two parts of the layout: equipment beneath the van and air distribution inside. My documented roof work and interior preparation also show how closely equipment locations, cable routes and finished surfaces interact.
The five essential tips in this guide are to define the cooling job, compare equipment formats and heating functions, budget the complete power system, plan the installation space and preserve maintenance access. The sections below turn those decisions into a practical comparison you can use while choosing a system that fits your own travel routine.
- Define the cooling job: Describe the weather, occupied space and hours when you want cooling.
- Compare the formats: Separate the equipment location from its cooling and heating functions.
- Budget the complete system: Include supply capability, stored energy, charging and installation components.
- Plan the whole installation: Draw equipment, air paths, connections and service positions together.
- Preserve maintenance access: Make filters, drains and inspection points part of the finished layout.
Importance of Air Conditioning in Campers
Comfort depends on more than the thermostat setting. Sunshine through the windows, the temperature outside, cooking, occupants and the van’s construction all affect the heat the system must remove. Humidity adds another part to the cooling task.
A compressor air conditioner transfers heat from the interior to an outdoor heat exchanger. A roof fan moves air through the vehicle. Both can be useful in a camper, but their jobs and power requirements differ. My MAXXAIR purchase belongs to the ventilation plan; the UndermountAC purchase belongs to the refrigeration-based cooling plan.
Start with the activity you want to support. Cooling a van before bed, maintaining a comfortable workspace during the afternoon and operating at a powered campsite create different use patterns. Include the hours you expect to run the equipment and the conditions during those hours.
Geotrek’s camper cooling article treats the air conditioner, battery system and insulation as a combined package. That relationship is a useful comparison principle: evaluate the equipment together with the vehicle and its energy supply.
Define success in terms you can observe later. Record the outside conditions, the interior location where temperature is measured, the selected mode and the power source. A consistent record helps distinguish the experience of using the system from an isolated specification.
Overview of Options
Rooftop units place the main appliance above the living space. Portable units occupy interior space and need an arrangement for rejecting heat outdoors. Split systems distribute components between indoor and outdoor locations, including underbody arrangements designed for particular vehicle layouts.
A camper heat pump describes an additional heating capability. It can share a mounting format with other air conditioners. Likewise, a unit advertised with heating may use a separate heating element rather than a reverse-cycle heat pump, so compare the actual heating method.
The supply architecture is another independent distinction. Some units operate from an alternating-current supply, while others use a specified DC voltage. Record voltage and AC/DC designation alongside the model number. “AC” can mean air conditioning in a product title and alternating current in an electrical specification.
My purchased UndermountAC equipment illustrates the split arrangement. The indoor evaporator, underbody condenser and separate compressor connect interior air distribution with the underbody layout.
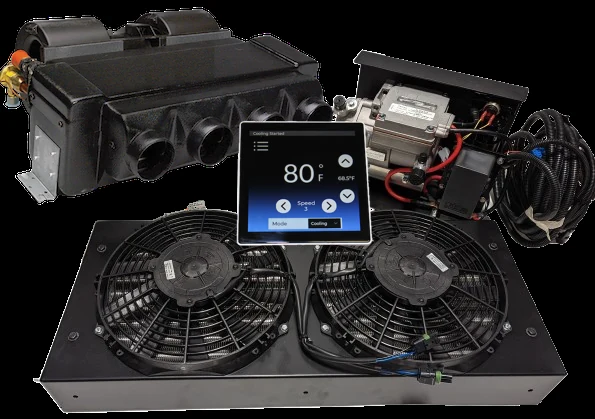
UndermountAC 12V Ducted Air Conditioner
This 12V air-conditioning system separates the condenser and compressor from a ducted indoor evaporator. The arrangement distributes cooling equipment between the space beneath the van and the interior duct route.
View at UndermountACSee my UndermountAC purchase page for the record and component comparison. The original system links to its manufacturer, while the Amazon alternative later in this guide is clearly identified separately.
Retail collections such as Vanlife Outfitters’ air-conditioner range show how voltage, mounting and installation kits divide the options. Use those categories to organize a shortlist, then compare each exact model’s documentation.
Understanding Your Needs
The first tip is to define the cooling job in enough detail that two candidate systems can be compared fairly. Use the same climate assumptions, living space, operating hours and power sources for both candidates.
Climate Considerations
List the conditions you expect on your trips: hot afternoons, warm nights, humid coastal stops, dry desert camps or cooler shoulder-season mornings. Separate the conditions during driving from the conditions while parked. The parked living-space requirement is a distinct part of the plan.
Sun exposure matters. Compare the windows, cab glazing, shades and body surfaces that receive direct sun during the hours you want cooling. Include whether the cab remains part of the conditioned space or is separated by the planned interior arrangement.
Humidity deserves its own field in the comparison. Cooling can also remove moisture as water condenses at the indoor coil. A comfortable interior involves both temperature and moisture control, so a capacity comparison should reflect the conditions in which the equipment operates.
ENERGY STAR’s room-air-conditioner guidance explains why oversizing can affect humidity removal. For a camper, combine that general principle with the vehicle’s heat gain and the candidate manufacturer’s application information.
Compare the published operating range with your intended cooling and heating conditions. A thermostat’s selectable temperature range describes the control setting; an outdoor operating range describes a different specification. Keep both labels with the numbers you record.
For a trip notebook, describe two scenarios: an ordinary stop and the more demanding conditions you expect to encounter. Add sunshine, occupancy and cooking activity to each. This creates a more useful starting point than choosing equipment from a single average outdoor temperature.
Compare the timing of heat gain with your arrival routine. A van that has spent an afternoon in direct sun presents a different starting condition from one already maintained near the chosen temperature. Record whether the task is pulling down the temperature after arrival or maintaining it during an occupied evening.
That distinction also shapes equipment comparisons. Look for operating information that matches the mode and conditions you intend to use. A low-speed setting may serve a different part of the routine from a higher-output setting used after arrival. Keep the selected mode with any input-power figure you record.
Size of Camper
Measure the finished space you intend to condition. Record length, width and usable interior height, along with the cab connection, windows and major partitions. A vehicle’s external length does not describe the whole cooling problem.
Use consistent units. For a hypothetical rectangular space measuring 12 feet by 6 feet by 6 feet, the volume is 432 cubic feet. That calculation describes the space; the next step is to account for its surfaces, glazing, insulation, sun exposure and occupants.
Cooling capacity is commonly expressed in BTU per hour. Electrical input is expressed in watts or current at a specified voltage. These describe different quantities: heat removed and electrical demand. Keep them in separate columns when comparing a camper air conditioning unit.
The Coleman-Mach 48000-series operation manual identifies vehicle size, window area, insulation, sun, outside temperature and occupants as heat-gain factors. That is a useful set of inputs for a vehicle comparison.
Also examine air distribution. A large open living space and a layout divided by cabinetry may present different routes for supply and return air. Include the bed, seating area and the position where temperature is sensed in the drawing.
Compare the same finished interior for every candidate. Changing the assumed cooled area or omitting the cab for only one option can make an equipment comparison misleading. A clear space description keeps the shortlist consistent.
With variable-capacity equipment, compare the published operating range as well as the maximum output. The lowest available cooling output can matter during lighter conditions, while maximum output addresses a different part of the demand. ENERGY STAR describes this modulation as a distinction from a conventional compressor that alternates between on and off.
For a layout discussion, mark where people actually spend time. The bed, desk and front seating can occupy different parts of the conditioned space. Compare the planned air-distribution arrangement with those occupied positions, including any partition that changes the route between them.
Budget Constraints
The third tip is to budget the complete system, including its power supply. The appliance price is one line in that budget. Mounting parts, interior distribution components, controls, electrical work and installation labor can be separate lines.
Start by listing what the quoted package contains. A rooftop assembly may have a separate ceiling unit or thermostat choice. A split system may include particular line lengths, mounts and controls. A portable unit may need a suitable panel for its hoses and a storage arrangement.
Then add the power architecture. At a powered campsite, compare the unit’s supply requirements with the available connection and the other loads you intend to run. For battery operation, include usable stored energy, the supply path and how energy will be replenished.
Use a simple hypothetical energy example. An average input of 800 watts over four hours equals 3,200 watt-hours, or 3.2 kilowatt-hours, at the appliance. The battery-side budget also includes supply losses and the other equipment operating during that period.
Compressor cycling and variable-speed operation can change average input during use. Build the estimate from the candidate’s documented operating information and the scenario you defined, then refine it with observed data when the completed system is operating.
My van energy-budget and solar-sizing guide provides a place to organize those loads and charging assumptions. Put cooling into the same daily budget as refrigeration, lighting, charging and other planned equipment.
Finally, include routine consumables and access for future service. A system that fits the initial purchase budget but requires major furniture removal for basic maintenance has a different long-term ownership arrangement. Make those differences visible before comparing totals.
When budgeting a/c for camper trips, request comparable package descriptions. The following worksheet separates costs that are easily combined into one headline figure.
| Budget line | Identify in each proposal |
|---|---|
| Appliance | Exact model, voltage and supplied components |
| Mounting | Adapter, support, gasket and installation hardware |
| Air distribution | Ceiling assembly, evaporator, ducts and controls |
| Electrical supply | Required system components and connection work |
| Stored energy and charging | Changes needed for the intended daily use |
| Completion | Labor, commissioning and operating documentation |
Keep optional upgrades separate from the required package. This lets you compare a complete installation with another complete installation, then decide whether an added feature serves your trip. It also makes a later change in model or voltage easier to trace through the budget.
Types of Air Conditioning Units
The second tip is to compare the physical format and the heating method separately. The three options below answer different questions: where the appliance sits, how heat leaves the vehicle and whether the equipment also provides reverse-cycle heating.
Rooftop AC Unit
A rooftop air conditioner places its main assembly above the roof opening. Inside, a ceiling assembly may distribute air directly into the living space or connect to a compatible duct arrangement. Identify which version the candidate uses.
If your search starts with “rooftop ac unit camper,” record the complete model and its interior distribution components together. The opening size, supported roof thickness, mounting requirements and overhead clearance all belong in the comparison.
TOSOT’s 16,000-BTU RV product page provides a specific non-ducted rooftop heat-pump example. Its cooling capacity, electrical specifications and roof-fit information are separate parts of the product description. Compare each field independently.
Pros and Cons
The main spatial advantage is keeping the appliance off the living-area floor. A suitable ceiling arrangement can also put the controls and air outlets near the occupied space. Compare that arrangement with the planned bed, table and overhead cabinets.
The tradeoff is a commitment of roof area and an installation interface through the roof. Solar panels, a rack, fans, cable entries and service access share that space. Record the unit’s height as part of the finished vehicle’s external dimensions.
My roof work made this competition tangible: I moved rack cross beams for solar-panel fitting and coordinated cables, junction boxes and lights. An air-conditioner footprint belongs in that same roof plan before the surrounding equipment positions are settled.
Compare the sound information as carefully as the physical dimensions. A published sound figure belongs with its fan speed, operating mode and measurement conditions. Two numbers taken at different distances or settings do not describe the same comparison.
For your own walkthrough, identify the occupied positions nearest the equipment. The bed and table may have different relationships with the ceiling assembly. Include the sound of airflow at the selected outlet setting as well as the appliance itself when recording your observations.
Controls also influence the experience. Compare the location of the thermostat, the readability of the display and the steps needed to change modes. A remote control needs a storage location, while a ceiling-mounted interface needs a usable reach from the intended position.
Portable Air Conditioner
A portable air conditioner brings the appliance into the living area. The complete arrangement includes the cabinet, hose route, outdoor interface, electrical supply and condensate handling. Count those elements when comparing its footprint.
Single-hose and dual-hose designs handle the condenser airflow differently. GE Appliances explains that a single-hose design exhausts indoor air, while a dual-hose design uses separate outdoor intake and exhaust paths for the condenser side.
The practical comparison is the whole setup in the van. Identify where the hoses pass, how the opening is fitted and how the unit’s specified airflow clearances are maintained. Include where the equipment travels between stops.
Pros and Cons
A portable format can make it possible to deploy cooling for selected trips and recover the occupied area when the appliance is removed. It also lets you compare placement within the limits of the model’s hose and clearance requirements.
The tradeoff is interior space during operation and a setup routine at each stop. A unit beside the galley or bed needs to coexist with drawers, walking space and the activities you want to do while it runs.
For a fair comparison, draw the appliance with its hoses and required spacing, then add the normal bedding, luggage and table position. Include the steps for condensate handling and packing the system away. Portability becomes useful when that complete routine suits the trip.
Rehearse a normal stop on paper. Identify where the appliance comes from, where the outdoor panel stores, how the hoses reach their operating positions and what furniture remains usable. Reverse that sequence for departure. A setup with fewer permanent components can still have several daily handling steps.
For storage, include the unit’s handles, wheels and connectors in the dimensions you compare. The outside cabinet size is only part of the movement route through the van. This is the same access question I use when comparing drawers, bins and other removable equipment in the build.
Camper Heat Pump
A reverse-cycle heat pump can cool the interior and also move heat indoors for heating. The direction of heat transfer changes between modes. Its physical mounting arrangement and electrical supply still need their own comparison.
The EPA’s heat-pump explanation describes transferring thermal energy rather than producing all the heat through electrical resistance. For a camper model, examine the manufacturer’s heating capacity and operating range alongside the cooling information.
Distinguish a heat pump from an air conditioner paired with another heating method. An electric resistance element and a hot-water heating coil have different operating arrangements. The current UndermountAC ducted product description, for example, includes a coolant-coil heating option.
Pros and Cons
The benefit is combining cooling and an appropriate heating function within one equipment arrangement. For trips with mild mornings and warm afternoons, that can put both comfort tasks at the same control interface.
The tradeoff is that heating performance and operation depend on the exact model and outdoor conditions. Include the specified cold-weather behavior, any defrost operation and the electrical demand for the modes you intend to use.
Compare the heating plan for the whole trip. Record when the heat pump would operate and how that fits the vehicle’s other heating equipment and energy supply. A heating label becomes useful when its actual method and operating conditions match the intended routine.
Imagine a shoulder-season itinerary with a cool morning at one stop and a warm afternoon at the next. Compare the heating and cooling modes against those separate conditions. Record the expected operating period for each, rather than combining both into a single daily runtime assumption.
Then repeat the comparison for a colder itinerary. The useful documentation changes to the model’s heating behavior at the relevant outdoor temperature and the operation of the complete heating arrangement. This makes the choice about the trips you take, while keeping cooling and heating demand identifiable in the energy plan.
Installation Considerations
The fourth tip is to plan installation as a complete layout and connection project. Equipment location, support, air distribution, drainage, power and access influence one another. Put those requirements into the drawing before treating the appliance choice as settled.
DIY vs. Professional Installation
Break the installation into work packages. A typical plan may include measuring and documenting the space, preparing the mounting arrangement, fitting interior distribution components, completing the supply path and commissioning the system. Identify the requirements for the exact equipment at each stage.
A self-managed build and a shop installation can organize those tasks differently. For either route, a clear specification records the model, supplied parts, additional materials, completed tasks and final operating checks. That makes the scope easier to compare.
A factory-contained rooftop appliance and a split kit that requires assembly involve different work. UndermountAC’s product information identifies assembly and refrigerant-system commissioning as parts of its kit arrangement. Include those tasks in the installation scope alongside the component mounting.
For a quotation, ask for the appliance and installation components to be identified by model or part number. Include the mounting interface, interior distribution, controls, electrical connection and commissioning record. A line saying “install air conditioning” leaves many comparison fields unanswered.
For a staged personal build, keep a record of what is complete before the next layer closes access. My Day 87 preparation diary used this approach for body openings ahead of framing and panels. The same sequence helps coordinate a cooling layout with the rest of the interior.
The final handover should connect the installed equipment with its operating instructions, maintenance access and documented settings. Those records make everyday use and later troubleshooting more organized, regardless of who completed each work package.
During the completed-system walkthrough, identify the control for each operating mode and the location of the return and supply openings. Record the installed model, thermostat and any separate ceiling or indoor assembly together. Add the filter-access method, condensate route and location of the relevant documentation. Then check that the normal packed layout leaves the intended controls and service panels reachable. This turns the installation handover into a practical reference for using the equipment, rather than a collection of disconnected product leaflets stored somewhere inside the van.
Space Requirements
Compare the occupied space in three views: above the roof, inside the living area and beneath the vehicle. Then add the routes linking the components. Placing an air conditioner in camper furniture changes both its immediate footprint and the access around it.
For rooftop equipment, draw the roof opening and the entire external assembly. Add the interior ceiling unit, roof structure, rack members, solar panels and the route used for maintenance. Include the required mounting and airflow spaces from the selected documentation.
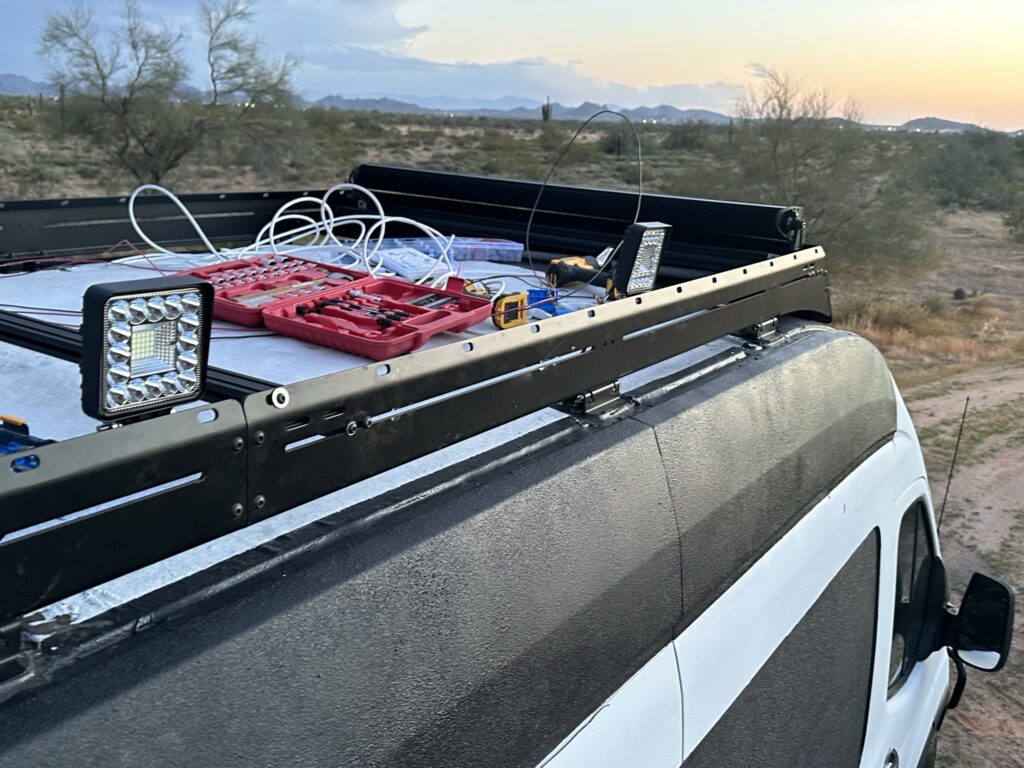
For a split system, compare every component location and the connection routes between them. The underbody footprint, indoor evaporator, ducts and service positions are parts of one plan. My purchased system brought these spaces into the same cooling decision.
An Amazon alternative to compare
The NEKPOKKA below is a separate split-system alternative from the catalog. Its indoor and outdoor components illustrate another physical arrangement to compare with the UndermountAC purchase.
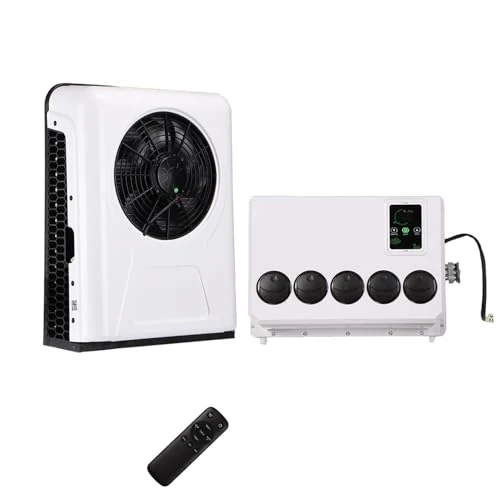
NEKPOKKA 12V Split Air Conditioner
This NEKPOKKA air conditioner uses a 12V split-system arrangement. Separate indoor and outdoor components provide another layout for distributing cooling equipment around a vehicle.
View on AmazonDraw the actual component outlines rather than replacing them with one generic air-conditioner rectangle. Include connectors, hose bends, duct openings and access to fasteners. A component that fits into an empty bay still needs a workable route into position.
Inside, compare supply and return airflow with the furniture finished. Bedding and stored bags have their own occupied space. Plan outlets and controls where they can serve the living area while the bed and table are in their normal positions.
Electrical System Compatibility
Record the model’s required supply voltage, AC/DC designation, operating demand and startup characteristics. The supply system must be compared with the whole set of requirements. A cooling-capacity number does not describe the electrical connection.
For an alternating-current appliance supplied through an inverter, separate the inverter’s continuous and startup capabilities from the battery’s stored energy. One describes the ability to supply power; the other helps determine how long the planned loads can operate.
For DC equipment, retain the specified voltage range and supply requirements with the circuit plan. The label “12V” identifies an electrical format, rather than a promise of a small current draw or a particular battery runtime.
Use another hypothetical calculation to make the distinction clear. At 12 volts DC, 960 watts corresponds to 80 amperes in an ideal calculation. For an AC load at 120 volts with a power factor of one, 960 watts corresponds to 8 amperes. Actual equipment and supply design use the manufacturer’s electrical specifications.
Next, add the simultaneous loads. Refrigeration, cooking appliances, charging equipment and cooling may share an energy source. Compare the planned combinations as well as each device independently.
Charging is the other side of the daily budget. Solar, alternator charging and shore power contribute according to the actual system and travel pattern. Record when charging is available and what other loads operate during those periods.
Keep the electrical record organized around equipment instructions, conductor routes, protection and connections. My Electrical & Solar library connects the energy-budget work with the existing wiring and component references.
A completed comparison should answer two separate questions: can the supply system support the appliance’s operating conditions, and does the daily energy plan support the intended hours of use? Resolving both makes the cooling choice much clearer.
A second worked example combines those questions with explicit assumptions. Suppose a hypothetical system has 8 kilowatt-hours of usable battery energy, an 800-watt appliance load through an inverter operating at an assumed 90 percent efficiency, and another 200 watts drawn at the battery side.
The cooling appliance then requires about 889 watts from the battery: 800 divided by 0.90. Adding the other load gives about 1,089 watts, or 1.089 kilowatts. Dividing 8 kilowatt-hours by that constant load gives approximately 7.3 hours. Every input in this example is an assumed planning value; the calculation shows how the fields relate.
Charging needs its own calculation. A hypothetical 400-watt solar array receiving four equivalent full-output hours produces 1.6 kilowatt-hours before system losses. Compare that figure with the earlier 3.2-kilowatt-hour appliance example and the rest of the daily loads. The comparison exposes a charging shortfall within those assumptions.
Use the same measurement boundary throughout your own worksheet. Label a figure as appliance input, inverter input or battery-side energy so losses and additional loads are counted once. This makes the arithmetic reviewable when equipment or travel assumptions change.
Maintenance Tips for Longevity
The fifth tip is to preserve access and a maintenance record from the beginning. Filters, air paths, drainage and mounting interfaces remain part of the system after installation. A useful layout lets routine care happen without dismantling unrelated furniture.
Regular Cleaning and Filters
Identify the exact filter arrangement and the manufacturer’s cleaning or replacement procedure. Record the filter model, access method and service interval in the equipment notebook. Include the tools needed to remove the relevant cover.
The Coleman-Mach manual linked earlier explains how clogged filters reduce airflow. Its procedure also distinguishes filter removal, cleaning and reassembly. Use the instructions for the installed model to define the actual task and schedule.
For a washable filter, follow the specified cleaning method and drying instructions before reassembly. For a replacement filter, keep the correct specification with the record. Restore the covers and filter position as part of completing the task.
Check the accessible supply and return openings during routine cleaning. Keep the intended air paths free of bedding, bags and accumulated debris. For ducted equipment, the accessible grilles and the route behind them deserve separate entries in the layout plan.
KoolRV’s product range focuses on air-distribution components for particular RV air-conditioner arrangements. The useful selection point is exact system fit: record the installed ceiling assembly and duct arrangement before comparing airflow accessories.
Use a simple dated entry after each task. Record what was cleaned or replaced, the parts used and any visible change in condition. The notebook becomes more useful when a later observation can be compared with a clear earlier record.
Maintenance access can be checked before the interior is finished. Draw the cover removed and the filter moving through its opening. Include the position of your hands and the place where the cover and fasteners will sit during the task.
For a concealed evaporator, identify the intended access panel in the furniture drawing. Keep that panel recognizable after trim and storage are added. A routine task remains more practical when the access route is designed with the appliance, rather than discovered after the cabinetry is complete.
Checking Seals and Insulation
Inspect the interfaces that belong to the installed system. A rooftop unit has a roof-to-appliance sealing arrangement. A portable setup has an outdoor hose interface. A split system has component mounts, line routes and body-entry details to include in the inspection record.
Identify the specified sealing method before selecting materials. A compression gasket, an adapter and a bonded or sealed entry each has its own installation detail. Keep the correct part and procedure with the equipment record.
Dometic’s FreshLight manual includes inspection of its roof seal and condensate drainage. It provides an example of why the sealing interface and the water-drainage route deserve separate maintenance checks.
Include insulation and interior finishes in the condition review. Look at the areas around the equipment, ducts and access panels. Compare their condition with the intended assembly and record any movement, damage or moisture observations.
My Transit insulation-preparation guide documents the earlier cleaning and planning stage. The practical connection is access: equipment entries and routes are easier to organize when they are considered before the surrounding finishes are installed.
Photographs can make later comparisons more useful. Capture the same interface from a recognizable position and add the date. Pair the image with the actual observation, such as a changed gasket condition or an obstructed drain opening, rather than relying on memory.
My Day 87 record includes applying sealant at bed-capsule joints after observing rain leakage. That was part of preparing the Transit body before the interior build continued. It made the condition of body interfaces a concrete project concern, alongside the routes and openings planned for equipment.
For the cooling system, keep its own interfaces identifiable in the record. Label each relevant opening or mounting location on the layout drawing and retain the associated component information. This gives future inspections a specific place and assembly to compare.
Seasonal Preparations
Before the cooling season, review the model’s operating and maintenance instructions, clean or replace the specified filters and inspect the accessible air paths. Check the condition of the relevant exterior interfaces and the condensate arrangement.
For a portable unit, include the hoses, outdoor panel, connectors and storage routine. For a rooftop or split installation, include the parts that remain exposed during storage. Use the equipment’s prescribed storage method and record which accessories were fitted or removed.
When returning the system to use, restore its operating configuration and complete the specified startup checks. Confirm that the intended outlets, returns and controls remain accessible with the normal travel equipment packed.
Make a short operating record under known conditions. Note the outside conditions, selected mode, thermostat location, power source and observed input where available. Compare future observations with that same measurement arrangement.
| Record | Why keep it? |
|---|---|
| Date and weather | Identify the conditions during the observation |
| Sun and occupancy | Describe the heat-gain scenario |
| Mode and settings | Keep the selected operation identifiable |
| Power source and input | Connect the observation with the energy worksheet |
| Measurement positions | Compare temperatures at the same locations later |
| Maintenance completed | Link condition changes with the service history |
Keep the original entry when a setting or component changes. Add a new dated observation and describe the change, so the record preserves the sequence. Over time, that gives you a useful history of the actual installation and its use across different trips.
Coleman-Mach’s owner resources link operating documentation, while retailers including RecPro, Camping World and United RV Parts organize replacement equipment and components. Keep the installed model and part identification at the center of any replacement search.
My final takeaway is to keep the five decisions connected: define the cooling job, compare the format and heating method, budget the power system, plan the installation and preserve maintenance access. A well-documented van air con choice has a clear place in the build and a practical routine for every trip.