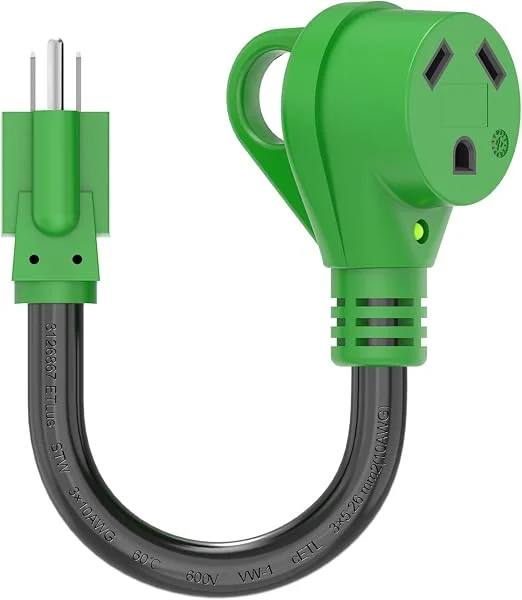
I bought a household-plug RV adapter as part of my camper van equipment. It is a small part beside the larger electrical equipment, but its two different ends answer a very specific question: how does a household-style supply connection meet a cord with an RV-style plug? My RVGUARD adapter has a 5-15P plug at one end and a TT-30R receptacle at the other. Those names are the starting point for this guide. I want the connection record to explain the actual parts rather than leave me with a bag of vaguely described thirty-amp accessories.
Start With The Supply And The Two Ends
A useful adapter description reads from the supply toward the equipment being supplied. For this particular arrangement, the supply-side end is the household-style 5-15P plug. The other end is a TT-30R receptacle. A matching cord's TT-30P plug connects to that receptacle. Writing that relationship out takes only a few words, and it prevents the phrase household adapter from hiding the direction of the connection.
I use the letter P to identify the plug and R to identify the receptacle in this record. The shape matters as much as the number in the name. A plug and a receptacle are complementary parts, whereas two plugs do not become a connection just because both descriptions mention thirty amps. A photograph showing only the outside color of a connector is therefore less useful than one that also shows its face and identifying marks.
Start a purchase comparison with two separate fields: supply plug and receiving connector. Add the exact pattern to each field before looking at handles, colors or storage dimensions. This gives the comparison a stable structure. If the supply end changes while the receiving end stays the same, the result is another connection arrangement, even when the overall product photographs look similar. That distinction is central to a small but usable shore-power kit.
What My Purchased Adapter Establishes
My RVGUARD adapter record identifies the item I bought. Its household-style plug, RV receptacle and short flexible section are the useful details for this discussion. I keep that purchase identity attached to the item rather than replacing it with the name of a broadly similar current listing. A later comparison can add another option without changing what was in my original equipment purchase.
This is the same distinction I make elsewhere in the build between choosing a component and documenting a finished installation. The purchase record tells me which adapter belongs in the equipment list. A connection record adds the particular outlet, cord and equipment arrangement being considered. Keeping those two records separate makes each more useful: one preserves the item identity, while the other explains the job the collection of parts is intended to do.
For a working equipment list, I would place the adapter beside its matching cord entry and link both to the broader AC-power notes. That makes it easier to find the physical connection question without searching through battery calculations or appliance lists. My AC-power guide covers the operating roles of the larger equipment. Here I am concentrating on the external adapter, its matching ends and the planning details surrounding a household supply.
Read The Current Listing Beyond Its Short Title
RV adapter titles often put two current labels beside each other, sometimes in a different order from the actual connection direction. The clearer check is the full pair of connector names. In this comparison, all three selected products specify a 5-15P male plug and a TT-30R female receptacle. That pair is what makes them relevant to the same household-to-RV-cord question.
On a shopping page, I check the selected product rather than relying on the search result alone. The chosen variation, main photograph and detailed connector description should describe the same arrangement. A listing that includes several patterns can show a family of related products without making every member interchangeable. Saving the exact product destination beside the written end names helps preserve the intended selection when returning to the page later.
I also keep the plain product photograph separate from a promotional graphic. A photograph can help compare the molded bodies and short cable. A graphic may explain a rating or a connection example, but it answers a different question. For this guide, the product pictures show the purchased adapter and two alternatives. Their captions identify the products themselves; they are not photographs of a completed connection on my Transit.
Connector Adaptation And Available Power
Changing the connector pattern does not create a larger household supply. The TT-30R end describes the receiving pattern on the adapter; it does not turn the source connected to the 5-15P end into a thirty-amp source. I keep that relationship in the equipment notes because the larger-looking connector can otherwise dominate the way the whole arrangement is described.
The current listings for the three compared adapters identify a 125-volt, 1,875-watt product rating. That is product-label information, not a measurement of a particular outlet or the van's demand. For planning, the adapter rating, the source circuit and the connected equipment remain separate entries. The usable arrangement has to account for the parts in the actual path rather than borrowing the largest number found on one connector body.
A simple arithmetic example helps keep the units visible: at an assumed 125 volts, 15 amps multiplied by 125 volts equals 1,875 watts. That calculation explains the relationship between the listing's numbers. It does not establish the voltage measured at an outlet, available circuit capacity or the operating power of any appliance. For an actual operating record, write the observed values beside their measurement point and keep the product's printed rating in its own field.
Trace The Complete Cord Path
The short adapter is only one link in a longer physical route. A useful plan starts at the available outlet, passes through the adapter, continues along the matching cord and ends at the equipment connection. Each transition deserves its own connector description. This makes a missing transition visible before a purchase is mistaken for a complete cord kit.
For example, the TT-30R receptacle on the household adapter is intended to receive a TT-30P plug. What happens at the far end of that cord is another selection question. A fixed cord and a detachable locking connection can require different arrangements. I would identify that far end directly rather than assume that the household adapter establishes compatibility with every van inlet carrying a thirty-amp description.
Record the components in their actual order. A short line such as outlet, adapter, cord and equipment connection is a useful heading, but the detailed record should spell out the mating patterns. Add a photograph of each loose connector face and a wider view of the entire collection. The face pictures explain identity; the wider picture explains which part belongs where. Together they make a more useful reference than a purchase receipt or a pile of loosely named cables alone.
Plan Reach Before Adding More Parts
A short adapter's flexible section separates its two molded ends, but it is not a substitute for the main cord's reach. I would measure the intended route from the supply position to the van connection, including the path around whatever lies between them. A straight-line estimate can miss the space used by corners, the position of the parked van and the location of the connection on its body.
Include the connector bodies in that layout. A molded plug can project farther than the cable itself, and a handle needs room for a hand. A receptacle cover, nearby wall or surrounding equipment can change the useful approach angle. A small physical mockup with the actual parts often reveals these details more clearly than a cord-length number in a product title.
Once the route is described, compare it with the length and format of the main cord. This is a better place to resolve reach than repeatedly adding adapters that each introduce another connector pair. I want the equipment list to show a purposeful arrangement: the required transition, a cord that suits the route and an identifiable equipment connection. That makes both purchasing and later packing simpler because each component has a defined role in the whole setup.
Compare The Purchased Adapter With Two Alternatives
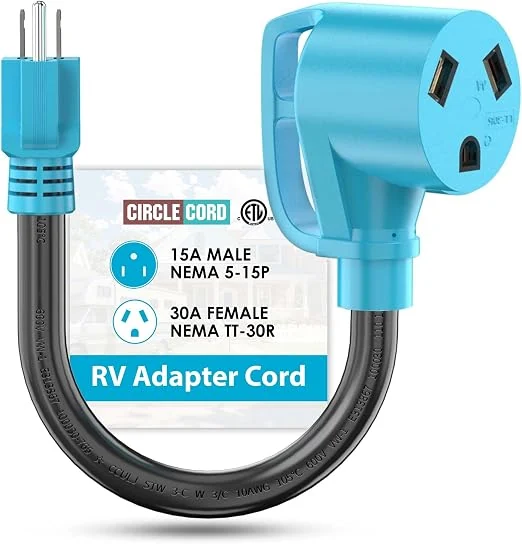
The RVGUARD is my purchased item in this comparison. The Camco Power Grip 55165 and CircleCord adapter are alternative products, each with the same stated 5-15P-to-TT-30R endpoint pair. Their shared connector arrangement makes it possible to compare the handling and body format without silently changing the supply connection being discussed.
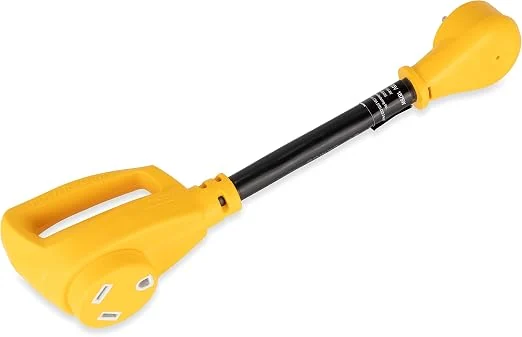
I start that comparison with photographs of the complete products. Look at the grip shape, the direction of the cable as it leaves each body and the space taken up by the receptacle housing. These are tangible details that can be considered alongside the location where the adapter will sit. A color preference can help organize a kit, but color alone does not identify an electrical pattern or establish that two products are equivalent.
After that, keep the written product identities beside the pictures. The Camco model number identifies one particular alternative; the CircleCord destination identifies another. My RVGUARD purchase remains the main record. This gives a reader three clear choices to investigate while preserving the distinction between what I bought and what I researched for comparison. The product cards provide the corresponding pictures, concise descriptions and exact Amazon destinations for those three items.
Make A Load List For The Intended Session
The most useful question is what the van will be doing while connected to that supply. A session intended mainly for battery charging is different from one that also includes several active AC appliances. Write those jobs down together before treating the presence of a connected cord as a complete explanation of the operating arrangement.
A practical list has an equipment name, its operating mode and the information source for its demand. A label value, a measured reading and an estimated planning allowance are different kinds of information. Keeping those categories visible lets the list improve as better information becomes available. It also prevents an estimate from gradually turning into a remembered measurement simply because it has been copied between worksheets.
Then consider which items operate at the same time. Separate tasks that can be scheduled from loads that normally overlap. The result is a description of a particular session rather than an assumption that every appliance will be available together. This is useful even before assigning numbers: the timing question can explain why two otherwise identical cord arrangements are being used differently. My electrical-system hub connects the equipment groups so the adapter plan can sit beside the wider record of sources, batteries and loads.
Keep Charging Demand Separate From Connector Size
A battery charger and the AC appliances can both be relevant to an external supply session. The charging setting is therefore another part of the operating record. The adapter's molded connector does not adjust the charger, select the source limit or describe what other equipment is running at the same time. Those are separate jobs elsewhere in the system.
Victron's published MultiPlus documentation describes an AC input current limit. That is an equipment setting, distinct from the physical adapter. I keep those concepts separate when reading a system description: one identifies the connection pattern, and the other concerns how the inverter-charger is configured to interact with its AC source. The correct manual belongs with the particular equipment record.
For planning notes, record the intended charging task, other simultaneous AC loads and the source information together. If a later session behaves differently, those details provide something concrete to compare. Without them, the story can shrink to the same adapter was connected, even though the operating conditions were different. A useful log explains what was expected to happen and which equipment was active, rather than asking a connector name to stand in for the entire electrical system.
Work Through A Specific Planning Example
Imagine a van parked near a building with a household-style outlet available. The intended task is a charging session while some interior equipment is being organized. This is a planning example: its purpose is to show the questions the record should answer before choosing the main cord and deciding what equipment will operate during that session.
First identify the outlet pattern and the source information available for that location. Then write the proposed adapter pair, 5-15P to TT-30R, into the record. Next identify the plug that would enter the adapter's receptacle. Continue to the far end of that cord and the van's connection. If one of those identities is missing, the equipment list is incomplete at that point. A longer main cord will not answer a missing connector-pattern question.
Now consider the physical route. The closest parking position may not be the position that gives the useful approach to the van's connection. A door, storage compartment or regularly used walkway may affect the arrangement. Record the route that will actually be used, including the position of the connector bodies. This turns a vague estimate of distance into a selection question about the particular cord format and reach.
Finally, list charging and the other intended loads as separate jobs. Decide which activities overlap and which can happen at another time. Save the connection record with those operating assumptions. If the parking position or task changes, revise the relevant field rather than treating the entire kit as wrong. This approach gives each change a location in the plan: source, connector pair, reach or operating task.
Compare Total Kit Cost Rather Than One Accessory
An adapter can look like the smallest purchase in the electrical list, but the useful comparison is the complete collection required for the intended arrangement. I would record the adapter, main cord and any genuinely required connection hardware together. This avoids buying a convenient-looking accessory first and only later discovering that the cord at home ends in a different pattern.
The same record can prevent unnecessary duplication. If an existing cord already has the required ends and sufficient reach, its role should be visible before another lead is added to the shopping list. If a second arrangement serves a different supply, describe that difference explicitly. Two adapters can both be useful without being substitutes for each other, and neither needs to be carried for a job it does not serve.
I would compare storage space and retrieval effort beside purchase cost. A cord that requires a larger compartment changes the packing plan. A compact adapter that is always buried changes how easy the kit is to use. Those practical differences are easier to judge when the whole collection is laid out than when several individual shopping pages are open in isolation.
For budgeting, keep the current offer separate from the original purchase entry. Product prices and available variations can change, while the historical identity remains the same. A complete kit comparison can therefore be updated without rewriting the van's purchase history. This is especially helpful when comparing the RVGUARD I bought with the Camco and CircleCord alternatives: the endpoint pair stays explicit, and each present-day option retains its own identity.
Give The Adapter A Clear Storage Location
A compact part can still be awkward to find when packed among several similar cords. I would give the household adapter a defined place beside the cord it is intended to accompany. The storage plan should leave both molded bodies visible enough to identify and avoid making another unrelated item the only thing keeping the cable organized.
Think about retrieval order as well as the space occupied by the coil. If the main cord is packed under several other items, the adapter's convenient location will not make the complete kit easy to retrieve. A good arrangement lets the relevant parts come out together while leaving unrelated electrical and workshop accessories in their own places. That is an organization problem worth solving before buying another container.
Use the written end names on a removable storage label or equipment card. An adapter described as household 5-15P to TT-30R remains understandable even if the product is replaced by another brand later. Keep the exact brand and product identity in the detailed record as well. The general connection description helps with day-to-day identification, while the detailed record preserves the purchase, photograph and comparison information.
Keep A Short Connection And Observation Record
For a useful connection record, I would start with the supply location and outlet pattern, then list the adapter and cord in order. Add the equipment connection, the intended task and any relevant equipment settings that have actually been checked. This makes the record specific enough to revisit without turning it into a long narrative every time.
Photographs can supplement those fields. One image can show the connector markings, another the complete laid-out kit and another the intended route. Describe what each picture actually establishes. A loose product photograph identifies a part; a route photograph shows placement; an operating observation records a particular session. Keeping those roles clear makes the collection easier to use when a question arises later.
If the arrangement changes, preserve the previous entry and add the reason for the change. A different cord length, another outlet position or a revised equipment location may explain the decision. My van-build decision log provides a broader way to organize that information. For this small accessory, the important result is a traceable connection plan that stays linked to the actual parts rather than a growing list of interchangeable-sounding adapters.
Questions About Household-To-RV Adapters
Does A Thirty-Amp Receptacle Make A Household Supply Thirty Amps?
No. On this adapter, TT-30R identifies the receiving connector pattern. The source-side plug is 5-15P. I keep the supply information and product rating in the connection record separately, so a number in the receptacle name does not become a claim about the available household circuit. The connected equipment's demand is another entry in that same record.
Is This The Same As A Locking Inlet Adapter?
The receiving end here is TT-30R, a straight-blade RV receptacle pattern. A locking connection has its own connector designation. To determine the complete route, identify the main cord's two ends and the equipment connection rather than assuming that the household adapter alone answers the inlet question. This is why I list each mating pair instead of shortening the whole collection to a thirty-amp lead.
Why Compare Three Brands With The Same Ends?
Matching the endpoints holds the main connection question steady. The comparison can then concentrate on the body shape, grip, cable format, documentation and storage arrangement. It also makes the shopping links more useful because each selected destination addresses the same specified pair of connectors. My purchase remains identified as my purchase, with the other products clearly presented as alternatives.
What Should I Check Before Ordering A Cord?
Write down the available supply pattern, both adapter ends, both main-cord ends and the equipment connection. Measure the intended route and include room for the molded bodies. Then compare that complete record with the selected product's actual description and photographs. This sequence produces a specific buying question instead of relying on a broad title such as RV adapter or shore-power cord.
My Takeaway For A Small Shore-Power Kit
I bought the RVGUARD household adapter as part of the van equipment. The useful lesson for organizing it is to keep its two connector identities visible and place it within a complete cord plan. That turns a small accessory into a clearly described part of the kit instead of another loosely named purchase that must be identified again later.
For a new selection, I would work through the supply, mating patterns, route, intended loads and storage in that order. The resulting record supports a focused comparison between the purchased product and the two alternatives below. It also connects naturally to the larger AC-power guide without repeating the entire electrical design. The aim is a kit whose parts, roles and current purchase options can be understood at a glance.
Compare The Adapter Options
RVGUARD 5-15P To TT-30R Adapter — My Purchased Adapter
This adapter cord joins a NEMA 5-15P household-style plug to a TT-30R RV receptacle. Its short flexible cable separates the two molded connector bodies.
View On AmazonCamco Power Grip 55165 Adapter — Alternative
This adapter joins a household-style 5-15P plug to a TT-30R RV receptacle. The short cord separates the two molded connector housings.
View On AmazonCircleCord 5-15P To TT-30R Adapter — Alternative
This short adapter cord has a NEMA 5-15P plug and a TT-30R receptacle. A blue molded grip surrounds the receptacle end.
View On Amazon