5 Must-Have Features in a Sprinter Van Camper for Ultimate Comfort

Introduction
A comfortable Sprinter van camper makes ordinary routines easy during your camping trips. You can get out of bed, make breakfast, find clean clothes and settle down for the evening without repeatedly unpacking the living space. The strongest features work together: an open interior, a supportive bed, a useful kitchenette, an appropriate bathroom and technology that serves the trip.
My own conversion is a Ford Transit. Working through its interior preparation, storage mockups and equipment purchases has given me a practical way to assess those features in a Sprinter: look at what each arrangement lets you do, what it occupies and what must move before you can use it.
This guide combines that documented build context with current examples from Sprinter conversion builders. It focuses on the details worth examining during a walkthrough or a layout-planning session. The goal is a van that supports your actual days on the road, from a quick weekend departure to an extended stay.
Overview of Sprinter Van Campers
The Mercedes-Benz Sprinter is a vehicle platform, while the camper conversion supplies the living arrangement. Two vans sharing the Sprinter name can have different body configurations, bed systems, bathrooms, appliances and storage access. Start every comparison with the specific vehicle and finished floorplan.
Mercedes-Benz’s Sprinter Cargo Van information separates vehicle configurations and dimensions. Builders then organize their conversions around particular versions. The Vansmith, for example, offers Sprinter layouts for different traveler groups and wheelbases, while Geotrek distinguishes models with different sleeping orientations.
Listings headed “camper mercedes benz sprinter” or “mercedes transporter camper” can describe substantially different finished vehicles. Record the model year, body configuration, builder and floorplan before comparing the comfort features. The recognizable badge is the beginning of the description.
Also distinguish a conversion within a van body from a Sprinter-based motorhome with a separate living body. The supplied Dr. Hannah Straight tour features a Winnebago EKKO Sprinter. Winnebago identifies the EKKO Sprinter as a Class C motorhome. Its living-space arrangement belongs in that context when comparing it with cargo-van conversions.
For a broader platform decision, my Transit, Sprinter and ProMaster comparison provides another starting point. Here, the focus stays on the finished interior and the five features that shape everyday comfort.
Robb Report’s camper roundup brings together several approaches to sleeping, kitchens and bathrooms. Use that variety to identify the kind of interior you want, then compare the relevant van-body conversions and motorhome layouts within their respective categories.
Importance of Comfort in Van Life
Comfort is the cumulative effect of small decisions. The cup has a place beside the bed. A refrigerator opens without clearing the countertop. A toilet can be reached when the sleeping arrangement is set up. Charging a phone does not require running a cable across the aisle.
Begin with a normal day rather than a list of attractive equipment. Write down where you wake, dress, prepare food, sit, wash and store the things you use. Then repeat the exercise for a rainy evening, an early departure and two people keeping different hours.
A useful walkthrough includes the transition between activities. Watch how the table stores, where bedding goes and what happens when the bathroom door opens. A photograph of the finished daytime layout can hide the space needed during those movements.
Temperature, airflow, light and noise also influence every feature below. Consider shades beside the bed, ventilation around the living space, appliance sound near sleeping areas and controls that remain readable at night. Treat these as parts of the daily routine while comparing the layouts.
My Day 87 interior-preparation diary records planning with SketchUp before the framing, floor and wall panels. That sequence made the relationships between systems part of the plan early. The same approach is useful when buying a completed van: examine how the features fit together, rather than scoring each one in isolation.
Give each feature a personal priority before the first viewing. For example, a ready-to-use bed might be essential, while a large television might be optional. Someone else may put a spacious daytime lounge first. This makes the comparison about your trip rather than the longest equipment list.
Keep a short note after each walkthrough: what worked for your routine, what required a changeover and what you would want arranged differently. Photograph the relevant opening or furniture position with the seller’s agreement. Specific observations are easier to compare later than an overall impression of luxury.
Feature 1: Spacious Interior
A spacious interior gives you usable room at the moments you need it. That means room for people and movement as well as equipment. The most useful comparison shows the van in daytime, sleeping and changeover states, with normal travel belongings included.
Layout Options
Start with the relationship between the bed, galley, seating and bathroom. A rear sleeping platform can leave a defined living area toward the front. A convertible lounge can share its footprint with the bed. A larger bathroom enclosure occupies space that another layout may give to seating or storage.
Compare those choices against your travel habits. A couple traveling with bicycles may prioritize an accessible gear area. Someone working inside may value a table and a supportive seating position. A person making short campground trips may organize bathroom space differently from someone spending more time away from facilities.
Geotrek’s Flatiron provides a specific example: its north-south bed and full-length galley organize the living space around those two features. The builder’s model range also distinguishes an east-west sleeping layout. Those are useful starting points for comparing movement and access.
During a walkthrough, stand where each activity happens. Open the refrigerator, cabinet doors and the storage you would use most often. Sit at the table with your feet in their normal position. Check whether someone else can move through the living area while you remain there.
For a proposed build, make a full-size floor outline and include the actual door openings and wheel wells. My usable-space planning guide separates those measurements from furniture dimensions. Finished wall and floor layers belong in the model too, because the usable space is the space left after the build.
A useful layout has somewhere for the things that otherwise become clutter: shoes, coats, a day bag, groceries and a rubbish container. Give those items named locations. A clear aisle drawn through an empty rectangle says less than an aisle that remains clear when the van is packed.
Finish by checking the morning and nighttime arrangements. Can one person make a drink while another rests? Does the table block a frequently used drawer? The best layout is the one whose tradeoffs fit your routine and whose transitions you can explain.
Utilization of Vertical Space
Vertical space can accommodate overhead cabinets, shelves, hanging storage and equipment below a raised bed. The practical question is which items belong at each height and how you will reach them. Count the opening and the access route as part of the storage.
Reserve convenient locations for frequently used items. Store everyday food where you can reach it while preparing a meal. Put reading glasses and charging leads beside the place you use them. A tall storage area becomes more useful when its contents are divided into reachable sections.
Overhead cabinets also shape how the interior feels. Compare the cabinet depth with the position of your head when sitting or moving around. Windows, lighting and open sightlines can affect the experience of the same floor footprint.
My Day 106 project provides a concrete access example. I designed a roof-storage assembly in SketchUp, represented dimensions with timber on the patio and worked on a bin drawer and frame. The photograph below shows the drawer extended during that mockup stage.
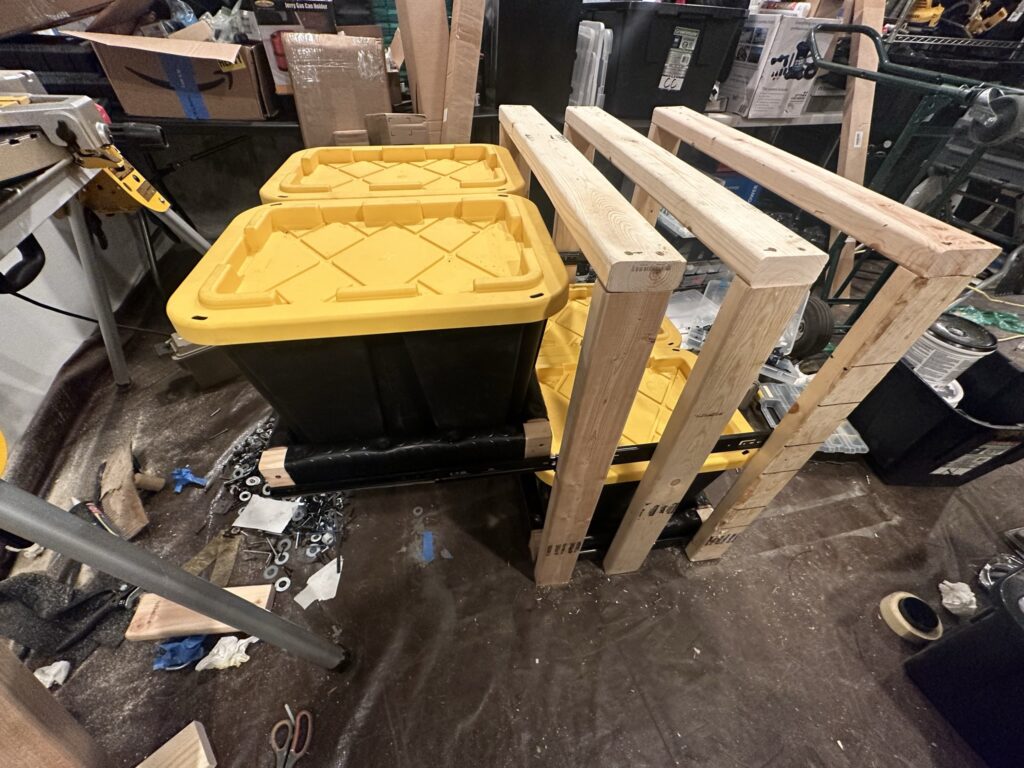
The relevant lesson for an interior is simple: draw storage open as well as closed. Include the container, lid, handle and the place you stand to retrieve it. A large compartment is useful when its contents can actually come out through the intended opening.
Under-bed storage deserves the same check. Decide which items need rear-door access and which need access from inside. Compare that arrangement with the bed occupied and the normal bedding in place.
Use height deliberately rather than filling every available surface. A thoughtful mix of accessible storage and open living space can feel more comfortable than a larger collection of cupboards with awkward openings.
Feature 2: High-Quality Bed Systems
A high-quality bed system combines a suitable sleeping surface, supportive structure, usable dimensions and a practical way to get in and out. Evaluate the complete arrangement, including bedding, the space above it and the storage that shares its footprint.
Types of Beds
A fixed platform keeps a dedicated sleeping footprint. Bedding may remain in place, and the space below can have a defined storage role. The tradeoff is the area continuously allocated to the bed, so compare the remaining lounge and dining space.
A convertible dinette or sofa uses the same area for more than one activity. Examine the mattress or cushion arrangement after conversion, including seams and changes in support. Write down each setup step and the destination of every loose item.
A lift bed changes the vertical relationship between sleeping space and storage. Winnebago’s Revel series illustrates this approach with a power lift bed and gear storage below. Compare the useful space with the bed in each intended position, along with the operating and access requirements.
A power sofa bed offers another arrangement. Grech’s 2027 STRADA-ion page lists a memory-foam power sofa bed within its lounge-oriented interior. This creates a different comparison from a raised platform with a separate gear area.
Orientation matters as much as mechanism. A north-south bed runs along the vehicle; an east-west bed runs across it. Compare the finished sleeping length at the actual mattress height, along with each person’s access route. Body extensions and finished wall shapes belong to the specific vehicle being examined.
My Day 87 notes record preparation around the bed-capsule openings in my Transit and planning for an elevating bed system. That work puts the sleeping area into the broader interior sequence: body shape, finishes and mechanism all affect the space available.
During a stationary walkthrough, sit on the bed, check the reach to nearby storage and examine how the sleeping surface is supported. Ask to see the exact mattress arrangement and the complete changeover. Those observations help distinguish the experience of using the bed from the appearance of an empty platform.
Comfort vs. Space Efficiency
Compare bed systems using the same sleepers, bedding and carried equipment. Otherwise, a layout may appear more efficient simply because its drawing omits the duvet, pillows or bags that another drawing includes.
| Arrangement | Useful comparison | What to examine |
|---|---|---|
| Fixed platform | Dedicated sleeping footprint | Bed access, sitting room and storage openings |
| Convertible lounge | Shared seating and sleeping area | Cushion layout, bedding storage and changeover sequence |
| Lift bed | Sleeping and storage at different heights | Space and access in each intended position |
| Power sofa bed | Lounge seating that converts | Sleeping surface, operating space and displaced belongings |
Mattress thickness alone does not establish comfort. Consider the support underneath, the surface dimensions and your preferred sleeping position. Include a topper or additional bedding in the comparison if you intend to carry it.
Look at the space around the mattress too. Can you sit where you normally get dressed? Can you reach a light and a charging point? Do shades provide the privacy and light control you want? These details can matter more each evening than another large storage compartment.
Then rehearse the transition back to daytime use. A convertible bed may return useful floor space, but the process includes putting bedding away and restoring the table or seats. A fixed bed may simplify that transition while leaving a smaller daytime area.
My fixed-versus-convertible bed guide develops this comparison around daytime, changeover and sleeping arrangements. The central question is what each version lets you do with the same belongings.
The best balance reflects your priorities. A person who values a ready-made bed may accept its permanent footprint. Someone who uses a spacious indoor lounge every day may prefer a convertible arrangement. Make the tradeoff explicit before choosing the mechanism.
Consider two travelers who want to use a table in the morning but wake at different times. In one proposed arrangement, the table remains separate from a fixed bed. In another, the table forms part of the sleeping area. The difference becomes important before breakfast, when one person wants to sit and the other wants to keep resting.
Now add a bag stored beneath the bed. Compare access with someone lying down and with the bedding made up. This small scenario can reveal a practical difference between two otherwise appealing layouts. Repeat it with your own frequently used belongings and preferred sleeping routine.
Feature 3: Functional Kitchenette
A functional kitchenette supports the meals you actually prepare. It has appropriate refrigeration, a cooking method, water access, a useful preparation surface and reachable storage. Compare the complete meal routine, including setup, cooking and cleanup.
Essential Appliances
Begin with a short menu for a normal trip. Breakfast, a packed lunch and a simple evening meal can reveal the space needed for food, cookware and preparation. Coffee equipment, a large frying pan or particular fresh ingredients may influence the layout more than a long appliance list.
Refrigeration comes in several physical formats. A top-opening portable refrigerator needs access above its lids. A front-opening unit needs room for its door and a position from which you can reach its contents. Compare the model’s installation requirements with the intended cabinet arrangement.
I bought the SetPower TC75 with my kitchen equipment. Its top-opening compartments make lid access part of the layout discussion. The catalog photograph is particularly useful because it shows the space above the cabinet that the open lids occupy.
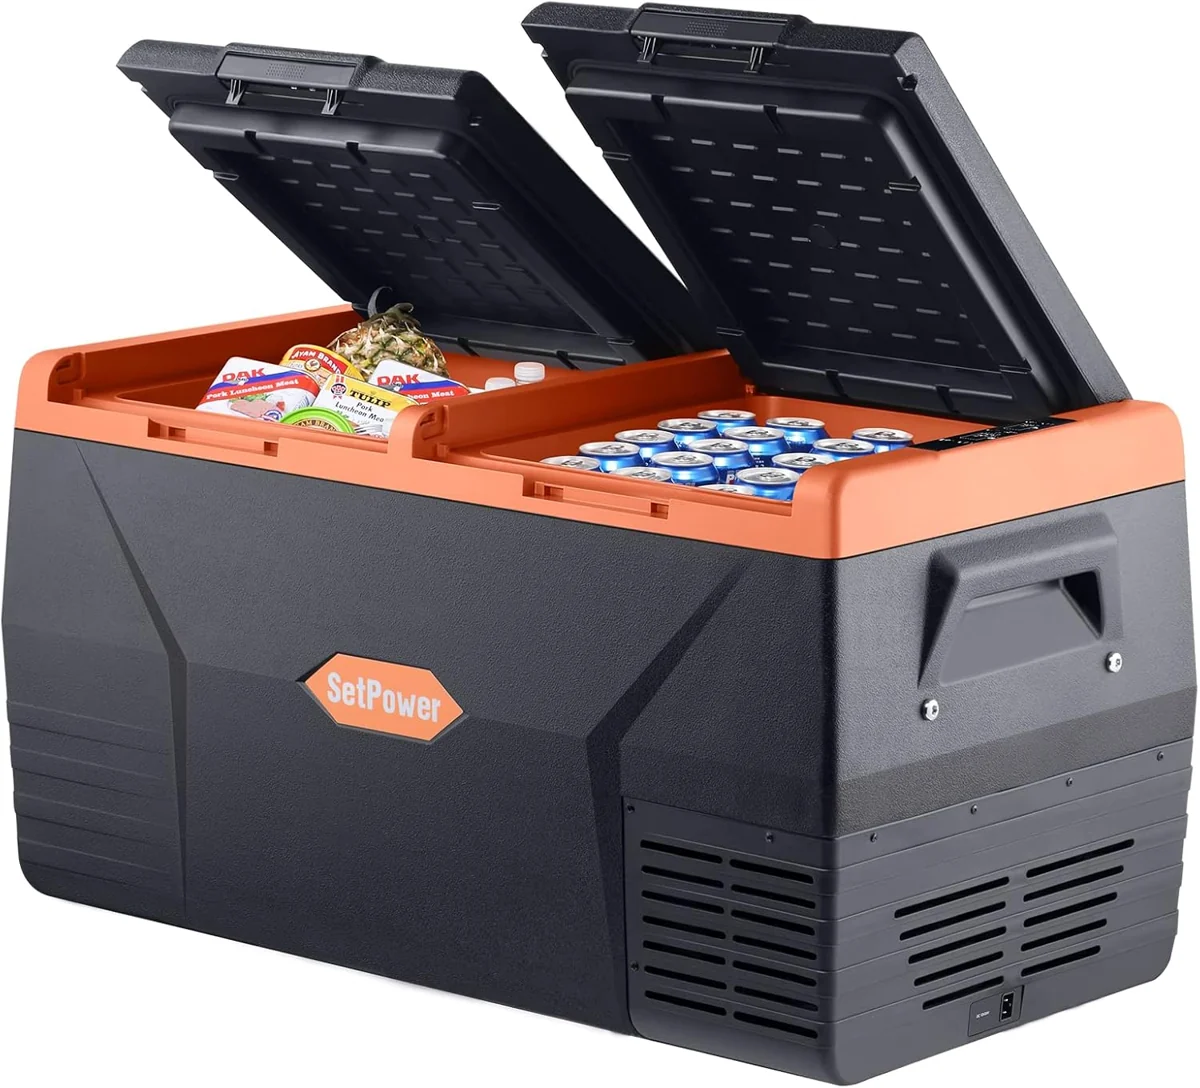
SetPower TC75 Portable Refrigerator
This portable refrigerator has separate compartments beneath its top-opening lids. The control panel is mounted on the outside of the cabinet.
View on AmazonMy SetPower purchase page also compares other cabinet and compartment arrangements. In a proposed kitchen, include food access with the table deployed and nearby drawers open. That is a more complete check than matching only the refrigerator’s closed dimensions.
For cooking, compare a fixed appliance with a portable unit and its storage location. An induction cooking arrangement connects appliance choice with the electrical plan and suitable cookware. The useful questions are where cooking happens, what else shares the counter and how everything stores afterward.
A microwave or combination oven is worthwhile when it serves your actual meals and has an appropriate place in the layout. Compare its external dimensions, door movement and specified installation space with the preparation surface you would otherwise have there.
The sink has a similar relationship with the counter. Choose its size and position alongside the cookware you wash, the faucet movement and the space remaining for food preparation. Include fresh-water supply, drainage and the location of serviceable components in that decision.
My interior-preparation notes placed water-related openings ahead of the framing and panels. That sequence is a useful reminder that the visible galley sits on top of earlier system decisions. A well-planned kitchenette joins those decisions into a coherent working area.
Design Tips for a Compact Kitchen
Arrange the kitchen around a sequence: retrieve food, prepare it, cook, serve and clean up. Keep the equipment used at each step within convenient reach. A compact galley can work well when those movements are straightforward.
Protect a real preparation area. A sink cover or fold-out extension may add useful surface, but compare the setup needed and where the cover stores. A surface that disappears whenever you open the refrigerator has a different role from an uninterrupted counter.
Draw appliances and storage open. Include refrigerator lids, cupboard doors, drawers and the place you stand while using them. Check the sequence with the bed and table in their normal positions, especially if two people use the interior together.
Use shallow, reachable storage for the items used most often. A spice container, knife storage location and pan lid can each need less space than the movement required to retrieve them from the back of a deep cupboard.
Compare a continuous galley with a split arrangement. A continuous surface groups preparation and cleanup, while a split layout may organize functions across the aisle. The useful choice depends on the actual openings, appliance formats and available movement space.
VanCraft’s Allterra shows how a builder combines a galley, storage and bathroom within one Sprinter model. Use a finished layout as a set of questions: where does each activity happen, what moves and which adjacent feature shares that space?
Include cleanup supplies and rubbish storage from the start. A pleasant-looking kitchenette can become frustrating if the bin, dish cloth and washing-up items have no accessible location. Give wet items a suitable place rather than counting an empty cupboard as a complete solution.
Finally, compare lighting and airflow at the working position. You should be able to see the preparation area while standing there, and the ventilation arrangement should serve the cooking routine. A comfortable kitchenette earns its space by working well from the first drink of the morning through the last dishes at night.
Try planning one complete breakfast on the candidate counter. Place the kettle or coffee equipment, a bowl, ingredients and the items used for washing up into the sketch. Identify which surface each occupies and when it becomes free again.
Then repeat the exercise while the refrigerator is open. A fold-out work surface may be useful during preparation but need to move for another step. Recording that sequence shows whether the arrangement suits your cooking style. Include putting everything away so the comparison ends with a usable living area again.
Feature 4: Bathroom Facilities
The right bathroom arrangement matches the way you camp and the privacy you want inside. Compare the toilet, washing facilities, water storage and everyday access as one system. The smallest closed footprint is only one part of that comparison.
Types of Bathroom Solutions
A dedicated wet bath combines showering and toilet facilities within a shared enclosure. Examine the usable standing and sitting positions, the door movement and where toiletries go during a shower. Then consider how the space returns to its next use.
Winnebago’s Revel series includes a wet bath that also has a gear-storage role. That arrangement shows why shared use deserves a closer look: identify which items move before washing and where they go. Compare the enclosure in each intended state.
VanCraft’s Allterra presents another wet-bath example with a removable toilet. Grech’s STRADA-ion describes an enclosed wet bath within its own floorplans. These examples share a broad feature category while differing in the surrounding interior and equipment arrangement.
A portable toilet can have a defined storage location and a separate position for use. I bought a YITAHOME portable toilet with my bathroom equipment. Its two-part assembly makes the room needed to separate, lift and carry the sections part of the layout question.
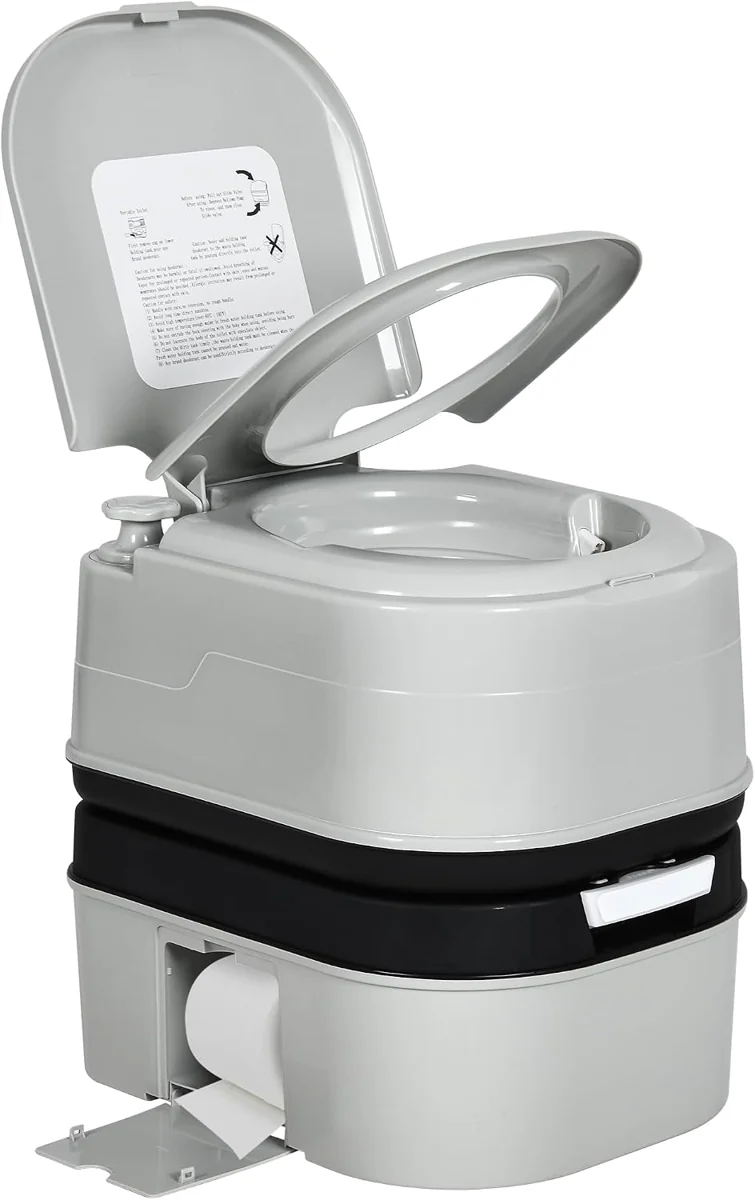
YITAHOME Portable Toilet
This portable toilet separates into an upper seat-and-flush section and a lower holding tank. A hand-operated pump and emptying spout are built into the assembly.
View on AmazonThe YITAHOME purchase page compares its format with other portable models. For any candidate, compare the seat position, lid movement, flush control and handling route with the actual space in the van.
An exterior shower connection creates a different washing arrangement. Compare the campsite routine, privacy setup and storage for the hose and accessories. A separate indoor enclosure may matter more when you want the whole washing routine to happen inside.
Toilet technology is another independent decision. A portable holding-tank model, a cassette arrangement and a separating toilet create different storage, handling and servicing routines. Record the equipment’s own requirements and the places where you expect to service it along your trips.
My Day 87 diary placed the planned shower drain and openings for three water tanks into the early preparation sequence. The useful connection is the order of decisions: locate the bathroom and water systems while their routes can still be planned alongside the rest of the interior.
Space-Saving Tips
Draw bathroom space in three states: stored, in use and being serviced. A removable toilet may occupy a compact storage area, but the complete plan includes bringing it out, opening the lid and reaching the controls. A fixed enclosure also needs usable room around its doorway.
Compare privacy with access. A screen, curtain or door needs a location when open and a position when closed. Check how it affects movement between the bed, galley and entrance. Include the routine of another person using the living area at the same time.
Use small storage features deliberately. A shallow shelf for daily toiletries can be more useful than a large compartment that must be emptied for a shower. Give towels, cleaning supplies and spare toilet items their own locations.
A shared bathroom and storage enclosure can reclaim part of the interior for more than one activity. The useful question is what changes between those activities. Write the sequence down, including where the stored equipment waits and how the enclosure is prepared for its next use.
Include the water routine in the space comparison. Fresh-water storage, wastewater storage and access to controls affect the rest of the van. A larger shower area and a larger water system are separate choices, so examine both instead of treating them as one feature.
Also consider the route for removing and carrying a portable holding tank. Measure the opening and compare it with the actual assembly, including handles and protruding parts. The route matters as much as the compartment’s internal size.
During a walkthrough, close the bathroom door and check the usable positions. Then open it and move through the adjacent living area. This simple sequence reveals whether the feature fits your daily routine more clearly than viewing the enclosure from the aisle.
For a trip plan, list the washing and toilet tasks you expect to do inside the van each day. Add cooking and drinking water to the same record. Compare that routine with the specified storage and the places you expect to refill or service the system. This connects the bathroom choice with the rhythm of the trip.
Feature 5: Advanced Technology
Useful technology supports navigation, communication, entertainment and awareness of the living systems. Its value comes from the tasks it makes easier. Compare controls and devices from the positions where you use them, alongside their power supply and connection needs.
Entertainment Systems
Begin with what you enjoy during downtime. Music, downloaded films, reading and occasional television can each lead to a different arrangement. A compact speaker and tablet may suit one traveler; another may prefer a dedicated screen and integrated audio.
For a screen, compare viewing positions with the bed, seats and table arranged normally. Include reflections from windows and access to the controls. The useful screen size is one that fits those positions and has an appropriate storage or mounting arrangement.
Grech’s 2027 STRADA-ion lists a television with Apple TV and an audio system among its entertainment equipment. That is a specific factory-integrated example. A custom conversion can organize entertainment differently around its seating and sleeping layout.
Think about sound near the bed as well as sound from the speakers. Locate devices and their cooling or operating noise in the layout comparison. A comfortable evening includes the equipment you hear when the film ends.
Lighting is part of the entertainment space too. Reading lights and independently controlled ambient lighting can serve different activities in one room. Check whether the controls are reachable from the seats and bed, and whether one person can use a light without changing the whole interior.
Keep charging practical. Identify the devices carried on a normal trip and the locations where they charge. A cable reaching a laptop at the table may need a different arrangement from a cable reaching a phone beside the pillow.
Plan the stored state of portable equipment. Headphones, remotes, charging bricks and tablets need accessible locations. Otherwise, a flexible entertainment setup can turn into another collection of loose objects that must move before meals or sleep.
Compare a connected evening with an offline evening. Downloaded entertainment and locally stored reading material can make the chosen setup useful without making every activity depend on a live connection. Choose the features you expect to use regularly and give them a sensible place.
Navigation and Connectivity Features
Separate vehicle navigation, internet access and house-system control. They may appear together on screens, but they answer different questions: where you are going, how your devices connect and what the living equipment is doing.
For the vehicle, compare the exact infotainment equipment and supported phone connection. Mercedes-Benz’s MBUX manual describes smartphone integration, including supported navigation and media functions. Keep the vehicle’s actual equipment and model information beside that reference.
For trip planning, record the finished vehicle’s dimensions and the places you intend to visit. Offline maps, saved campsite information and an organized itinerary can make the navigation setup more useful. Evaluate the entire planning routine, including finding the destination and arriving at the intended entrance.
Internet access may involve cellular equipment, a phone hotspot, satellite hardware or a combination. Compare the hardware locations, power requirements, device connections and the services that fit your intended use. Work calls, messaging and occasional browsing create different priorities.
Starlink kits appear in my van purchase records. My Starlink catalog page brings those records together and compares current equipment formats. The distinction between a separate outdoor dish and indoor router, or a more compact unit, makes placement part of the decision.
Starlink’s obstruction-map guidance explains the importance of a clear view of the sky. Include that requirement when comparing where the equipment operates and how it is packed between stops.
My documented roof work also involved coordinating solar equipment, mounting positions and cable routes. That is the practical connection between connectivity and comfort: the interior network equipment needs a planned relationship with the equipment outside.
For house controls, compare how you read battery information, water levels and temperature settings. Thor’s Sanctuary model information and other builder specifications provide examples of equipment organized by floorplan. Ask to see the controls operating in the exact van you are considering.
A clear control arrangement makes common tasks easy to recognize. You should be able to identify a reading light, find the relevant system display and reach a charging point without treating every routine as an app-navigation exercise.
Finish the technology comparison with an arrival sequence. Identify what you turn on, which connections you make and where each portable device goes. Include packing it again before departure. A system that is straightforward to deploy and store can contribute more to daily comfort than additional functions you rarely use.
Conclusion
The most comfortable Mercedes Sprinter camper is the one whose features support the way you travel together. Compare the complete daily routine, including storage, changeovers and system access, rather than adding up equipment names.
Recap of Must-Have Features
- A spacious interior: Compare the usable aisle, seating and storage with normal belongings included. Open furniture and rehearse the transitions between activities.
- A high-quality bed system: Examine the sleeping surface, support, finished dimensions and access. Include bedding storage and the full changeover sequence.
- A functional kitchenette: Organize refrigeration, cooking, preparation and cleanup around the meals you make. Compare appliance access with adjacent furniture in use.
- Appropriate bathroom facilities: Match privacy, washing and toilet arrangements to your camping routine. Include the space and access needed for servicing.
- Useful advanced technology: Choose navigation, connectivity, entertainment and controls that serve regular tasks. Plan their hardware, power and charging locations together.
Use the same questions for every candidate. A consistent comparison makes differences visible: which van leaves the table usable during sleep, which kitchen preserves preparation space and which bathroom arrangement fits the trip you actually want to take.
Encouragement to Explore Sprinter Van Options
When searching for a Sprinter camper van for sale, turn appealing photographs into a shortlist of concrete walkthrough questions. Record the builder, floorplan and exact equipment, then compare each of the five features in its normal operating state.
A Mercedes camper van may come from a specialist conversion builder, a motorhome manufacturer or a private owner. Vanlife Trader and Camping World’s Class B listings offer different ways to explore examples. Pair the listing with the specific builder’s floorplan and the actual vehicle you examine.
For a Mercedes Sprinter camper van on your shortlist, write a short account of a morning, an evening and a wet-weather day inside it. Include what moves, what remains accessible and where the things you carry belong. The exercise turns a feature list into a picture of daily use.
Compare the purchasing routes as carefully as the floorplans. An available completed van lets you examine its present arrangement. A proposed conversion requires a clear specification of the intended finished layout, equipment and materials. Keep the chassis description and conversion description together so each candidate represents a complete vehicle.
For a custom proposal, identify which decisions are still yours to make. Bed orientation, appliance format and bathroom arrangement influence one another, so resolve them in the same plan. Keep revisions with the model information and dimensions used for the comparison.
For a completed example, ask for a walkthrough that includes the movements discussed here. Seeing the table store, the bed change position and the frequently used compartments open gives you specific observations to take home. That record helps you choose between interiors that look similarly attractive in photographs.
My Tools & Materials hub, original Transit build diary and vehicle-reference library provide supporting purchase and planning context. Use those records alongside the Sprinter examples to choose an arrangement with clear reasons behind it.