The Ultimate Guide to Selecting the Right Wood Screws for Your DIY Projects
Introduction
Importance of Choosing the Right Wood Screws
Choosing wood screws starts with understanding the joint. A plywood base, a timber frame and a drawer slide can belong to the same project while needing different fasteners. The useful question is what the screw must pass through, where its threads will engage and how its head will meet the surface. Answer those questions before choosing a box by length, color or price.
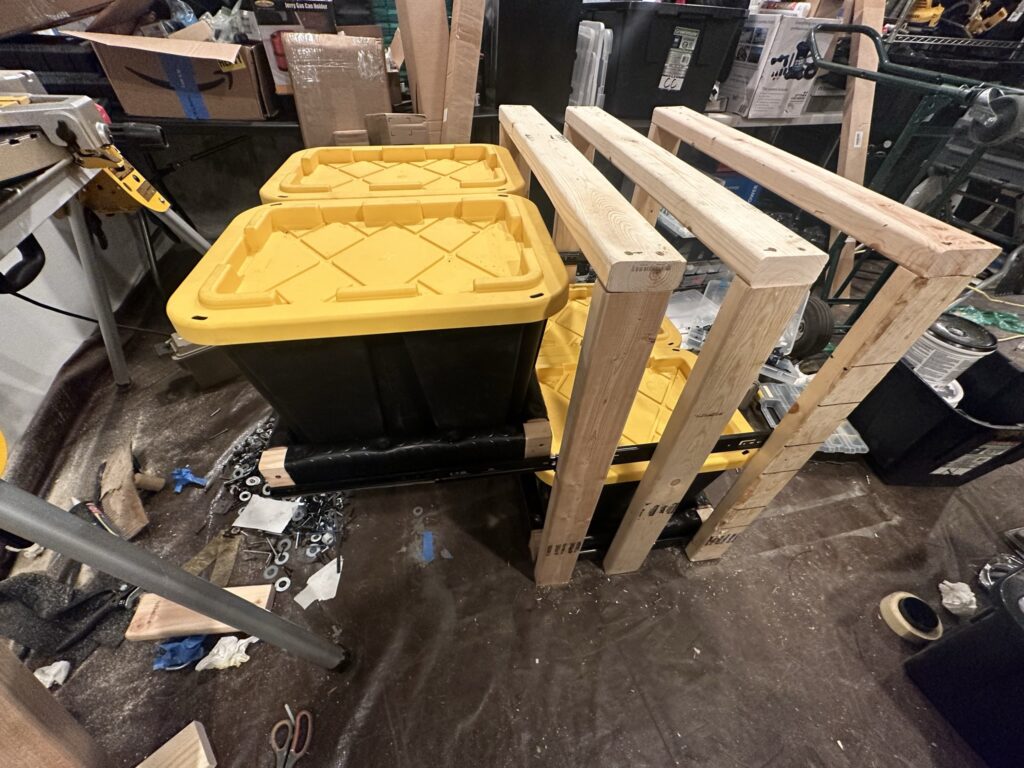
My camper van storage project made that distinction tangible. In my Day 106 build diary, I designed a storage system in SketchUp and cut timber on the patio to represent the van roof dimensions. I then worked on a storage-bin drawer and its cabinet frame. The notes record six-inch screws for the drawer's timber box, one-inch screws for the galvanized corner brackets and drawer slides, and one-and-a-half-inch screws for the plywood base.
The rubber lining introduced another fastening job. I recorded one-inch screws and flat washers at the timber, then half-inch screws and flat washers at the plywood. Those changes followed the layers being attached. They provide a practical starting point for a general DIY principle: select each screw for the particular connection in front of you.
For a furniture repair, that might mean matching a hinge's countersunk hole. For a shop fixture, it might mean drawing two wooden parts together while keeping the underside clear. For an outdoor timber connection, it includes identifying a product with the right application documentation and coating. A good selection connects the fastener, the materials and the intended job.
This guide follows that decision from screw types through sizing and installation. You will learn how to read a size label, compare head and drive options, separate small furniture screws from long timber fasteners, and build a useful shopping list. My photographs show the storage assembly during its patio construction stage, with the timber, brackets, panels and bins visible.
Overview of Different Types of Wood Screws
Think of screw selection as several choices working together. The threaded body engages the receiving material, the head bears against the attached piece, and the drive recess accepts the tool. Length determines reach, while diameter affects the space occupied by the fastener. Material and finish relate to the environment and the surrounding components. A useful product description identifies all of these features.
Woodworking screws cover many everyday cabinet, furniture and workshop tasks. Construction wood screws cover a broad range of building applications, with individual products carrying their own intended uses. Specialty fasteners address particular details, such as pocket-hole joinery, cabinet hardware or decorative fittings. These categories help narrow a search, but the exact model supplies the important installation information.
Retailer catalogs show why browsing by one attribute gives an incomplete picture. Lowe's wood-screw catalog groups products across several applications. Home Depot's selection separates length, head style, size and drive. Fastenere also separates wood fasteners by head and material. Use those categories as a checklist when comparing packages.
Head shape and drive shape deserve separate attention. A flat head has a tapered underside intended for an appropriate countersink. A pan or washer-style head has a different bearing arrangement. Phillips, square and star describe drive interfaces. Two flat-head screws can require different bits, and two star-drive screws can have different heads. Check both parts of the description.
A small assortment can help organize an evolving project, while a single-size pack makes sense when a cut list repeats the same joint. Either way, preserve the label. Once screws are loose in a tray, similar finishes can hide different lengths or threads. Sorting by complete identification makes the next decision easier than sorting by appearance alone.
For a quick comparison, place candidate screws beside the actual hardware and material samples. Compare where each head contacts the surface and where each point ends. Then compare the package information: intended application, material, finish and installation requirements. Bolt Depot's wood-screw categories are another useful reference for separating head, drive and material choices. Keep one candidate specification on each line of your notes. This makes differences visible even when product photographs look similar. Once the physical fit and documented application match the project, compare pack sizes and organize the purchase around the number of repeated connections. The final choice should remain easy to identify after the packaging has been opened. A clear label preserves that decision later.
Types of Wood Screws
Woodworking Screws
Woodworking screws are useful where the fastening detail affects fit, appearance and future access. A drawer bottom, face frame, jig or cabinet fitting each presents a different surface. Start by drawing the joint in section: the outer piece, any hardware, the receiving wood and the far face. That small sketch often reveals whether the proposed screw is too long or its head is unsuitable.
For a flush wooden surface, compare the screw's flat head with the countersink you plan to make. The recess should let the head seat cleanly without removing excessive material. For hardware with a flat bearing surface, compare pan, round or washer-style heads with the manufacturer's hole geometry. A broad head can interfere with moving hardware even when its diameter fits through the hole.
The thread arrangement also changes the assembly process. A partially threaded screw may place an unthreaded section through the outer piece. With a fully threaded screw, an appropriate clearance hole through that piece can help the parts draw together. The useful outcome is full contact between the parts before final tightening, rather than a gap held open by threads engaging both pieces.
McFeely's shop-screw range illustrates the distinction between diameter, length and drive within one woodworking category. Its listings include several lengths at the same numbered size. Rockler's wood-screw selection adds furniture-oriented head choices. Compare these physical features against your joint instead of treating “woodworking” as a complete specification.
For plywood, identify whether the screw enters a panel face or an edge. Record the panel thickness and where the fastener will sit relative to the edge. For solid wood, include grain direction in the sketch. These details help determine the product and hole preparation. Use a scrap assembly made from the same material to examine seating and alignment before repeating the connection across the finished piece.
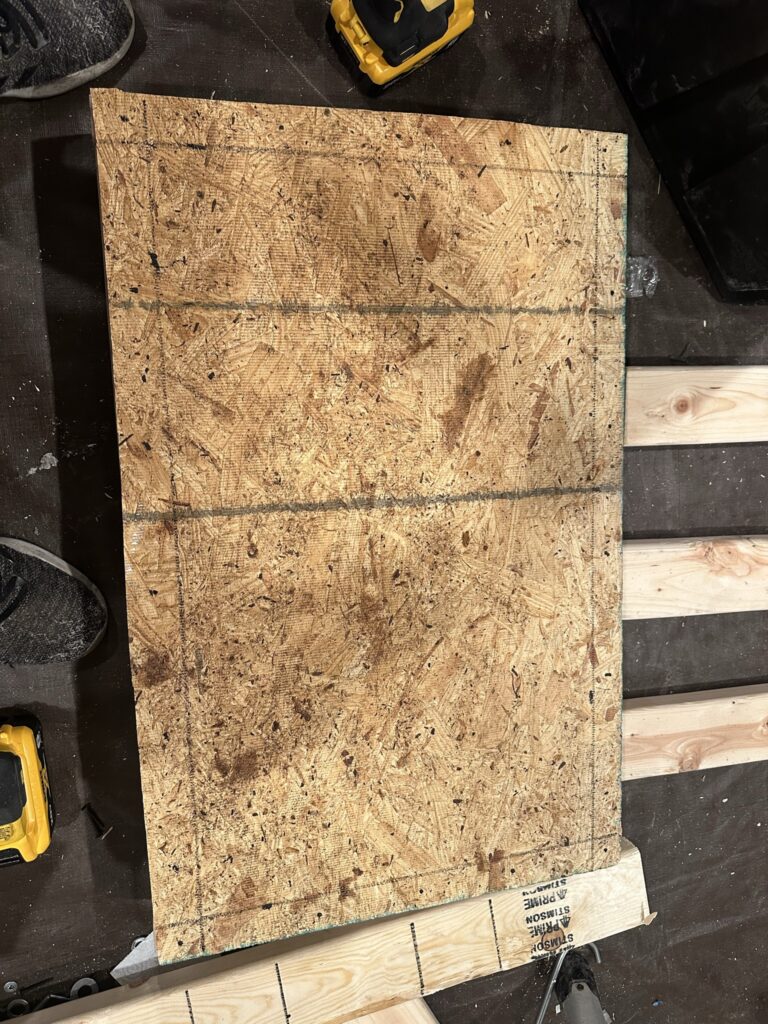
My marked drawer base is a useful visual example of this planning stage. The project photographs show marked fixing locations before the base was assembled. A marked panel turns the screw choice into a repeatable layout: the intended positions, the measured thickness and the selected fastener can be checked together before driving the first row.
Construction Wood Screws
Construction wood screws include products for timber assemblies, framing tasks and other building connections. The term is broad, so compare the exact application statement. A package marketed for general construction and a model with published structural connection tables supply different kinds of information. Select the product that documents the connection you are actually making.
Long screws deserve a complete identification. Along with length, record diameter, threaded length, head style, drive size and finish. These features affect access, hole preparation and how the head bears against the timber. A six-inch fastener with a washer-style head occupies a different surface detail from a countersunk screw of the same overall length.
Two six-inch retailer catalogs make this visible. Lowe's six-inch category and Home Depot's six-inch category contain multiple diameters and product families. Six inches is a length filter. Continue to the specific fastener's documentation to compare the remaining characteristics.
For outdoor work, add the wood treatment, exposure and adjoining metal hardware to your comparison. Look for the screw manufacturer's stated combination of material, coating and intended use. Color alone provides very little information about those combinations. Keep the actual model number with the project notes so a later replacement can be matched to the original selection.
The timber box in my Day 106 record used six-inch screws after holes were drilled. The diary then moved to shorter screws for the brackets and base. That sequence shows why a construction project can need several fastening formats at once. The timber-to-timber connection and the thin panel attachment occupy different depths, even when both are part of the same storage assembly.
Before buying a large box, plan tool access as carefully as screw reach. Include room for the driver body, bit and your intended approach angle. Check whether the screw can be installed while the parts are clamped and whether later stages will hide its head. Assembly order can determine when a perfectly suitable fastener becomes difficult to reach.
Specialty Screws for Specific Projects
Specialty screws solve particular interface problems. Pocket-hole screws work with the geometry produced by a pocket-hole jig. Cabinet screws may use a head intended to bear against a cabinet mounting detail. Hinge and slide screws fit holes supplied by the hardware manufacturer. Decorative screws can be chosen partly for the visible finish. Identify the interface before comparing the package quantity.
A pocket-hole joint brings together the jig setting, material thickness, screw length, head and thread. Treat that group as a system. Use the jig and fastener maker's matching information to choose the combination, then inspect the sample joint for alignment and seating. A screw selected for a conventional countersunk hole may have a different bearing shape from the pocket-hole fastener specified by the system.
Thread choice provides a concrete example. Kreg's pocket-hole screw guide distinguishes coarse threads for softer woods and suitable sheet goods from fine threads for dense hardwoods. The same guide separates head styles and environmental finishes. Work through those choices in order: identify the stock, select the appropriate system screw and confirm the matching jig setup. This approach keeps the thread decision connected to the material instead of choosing whatever pocket screw remains in the organizer.
Furniture hardware needs similar attention. On a hinge leaf, a head that sits proud can interfere with closure. On a drawer slide, a protruding head can occupy space needed by the moving member. Measure the hardware thickness and examine its intended screw positions. Use the specified mounting locations and head format so the hardware can complete its travel.
Another useful distinction is between wood screws and machine screws used with threaded inserts. An insert creates a threaded interface in the wooden part; the removable fastener then matches that internal thread. McFeely's threaded-insert reference gives model-specific dimensions and hole information. This arrangement offers a different approach for furniture or access panels that are designed for repeated removal.
On a van project, first identify the receiving material. A screw entering a wooden cabinet rail serves a different interface from a machine screw entering a nut in aluminum extrusion. My site includes aluminum-profile and hardware references alongside the wood projects. Keeping those systems distinct prevents a hardware shopping list from mixing incompatible thread formats.
The practical takeaway is to let the component determine the fastening detail. Keep the hinge, slide, bracket or insert model beside the screw specification. If a specialty connection comes with designated fasteners, record their full identification before replacing or supplementing them. That gives the finished project a clear parts record.
Sizing Wood Screws
Understanding Screw Sizes
A US wood-screw label commonly combines a numbered diameter with an inch length. In “#6 × 5/8 inch,” the number six identifies the diameter designation and five-eighths identifies the length. They answer separate questions. The first concerns the fastener's width; the second concerns its reach through the joint.
Bolt Depot's diameter chart lists a nominal major thread diameter of 0.138 inch for #6. Major diameter means the dimension measured across the outside of the threads. It is different from the smaller body dimension between the threads. Use the product drawing when you need the dimensions of a particular manufactured screw.
| Label detail | What it identifies | What to check next |
|---|---|---|
| #6 | Numbered diameter designation | Thread and body dimensions |
| 5/8 inch | Nominal screw length | Head measurement convention |
| Flat head | Head shape | Matching countersink and hardware |
| Phillips | Drive interface | Correct matching bit size |
| Material and finish | Fastener construction | Specified application and exposure |
Length measurements depend on head style. For a conventional countersunk flat-head screw, the head forms part of the nominal overall length. For a conventional noncountersunk head, length is generally measured from the bearing surface beneath the head to the tip. Confirm that convention against the selected product drawing when laying out a close-clearance assembly.
Three hole dimensions can appear in the same job. A pilot hole prepares the receiving wood for the threaded portion. A clearance hole lets the screw pass through the attached piece. A countersink receives the tapered head. Each has a different purpose, so one drill-bit number does not describe the complete fastening preparation.
Match a pilot-hole chart to the screw format and material. Bolt Depot's chart distinguishes hard and soft wood, straight and tapered bits, and countersink sizes. The important lesson is to identify which column applies before taking a measurement from it. Modern product instructions may specify their own preparation for a particular screw.
Differences Between 6 Inch Wood Screws and Size 6 Wood Screws
The difference is simple: 6 inch wood screws describe length; size 6 wood screws describe diameter. Searching for one when you mean the other can produce a completely different set of products. Add the number symbol when searching for #6, and include the actual length you need.
My purchased fastener catalog contains a clear comparison. The FMhotu screws below are six inches long. The FIXLINK screws are size #6 and only five-eighths of an inch long. Both belong in a wood-screw discussion, but they occupy very different dimensions. Their product pages preserve the individual item details and alternatives.
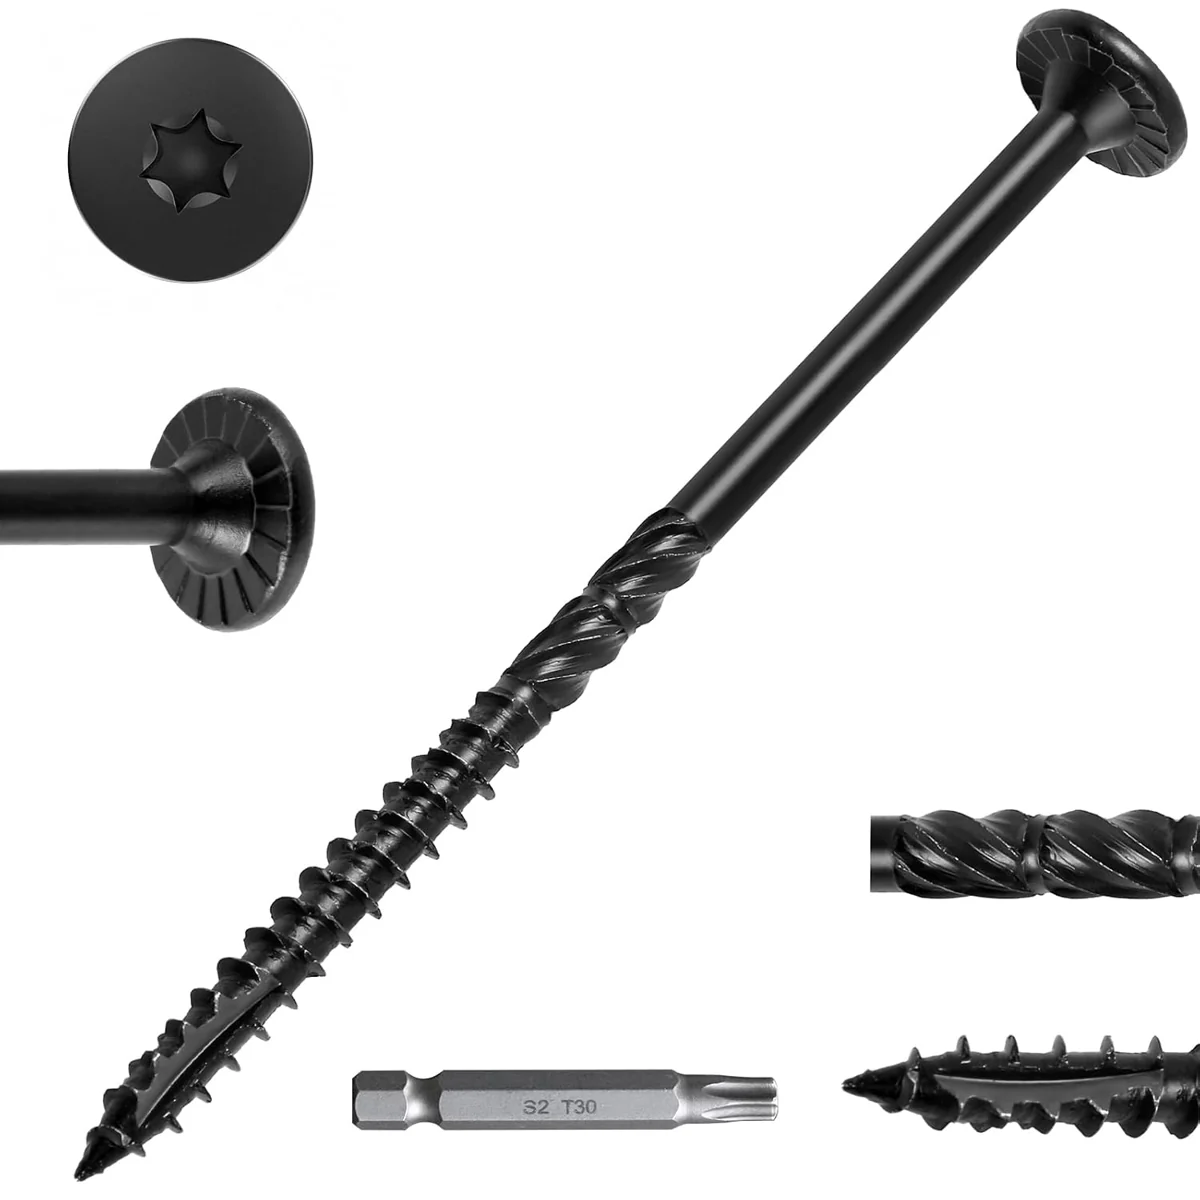
FMhotu 6-Inch Wood Screws
These FMhotu wood screws have long shanks for deeper timber connections. Their driven heads provide a mechanical fastening option for wood assemblies.
View on Amazon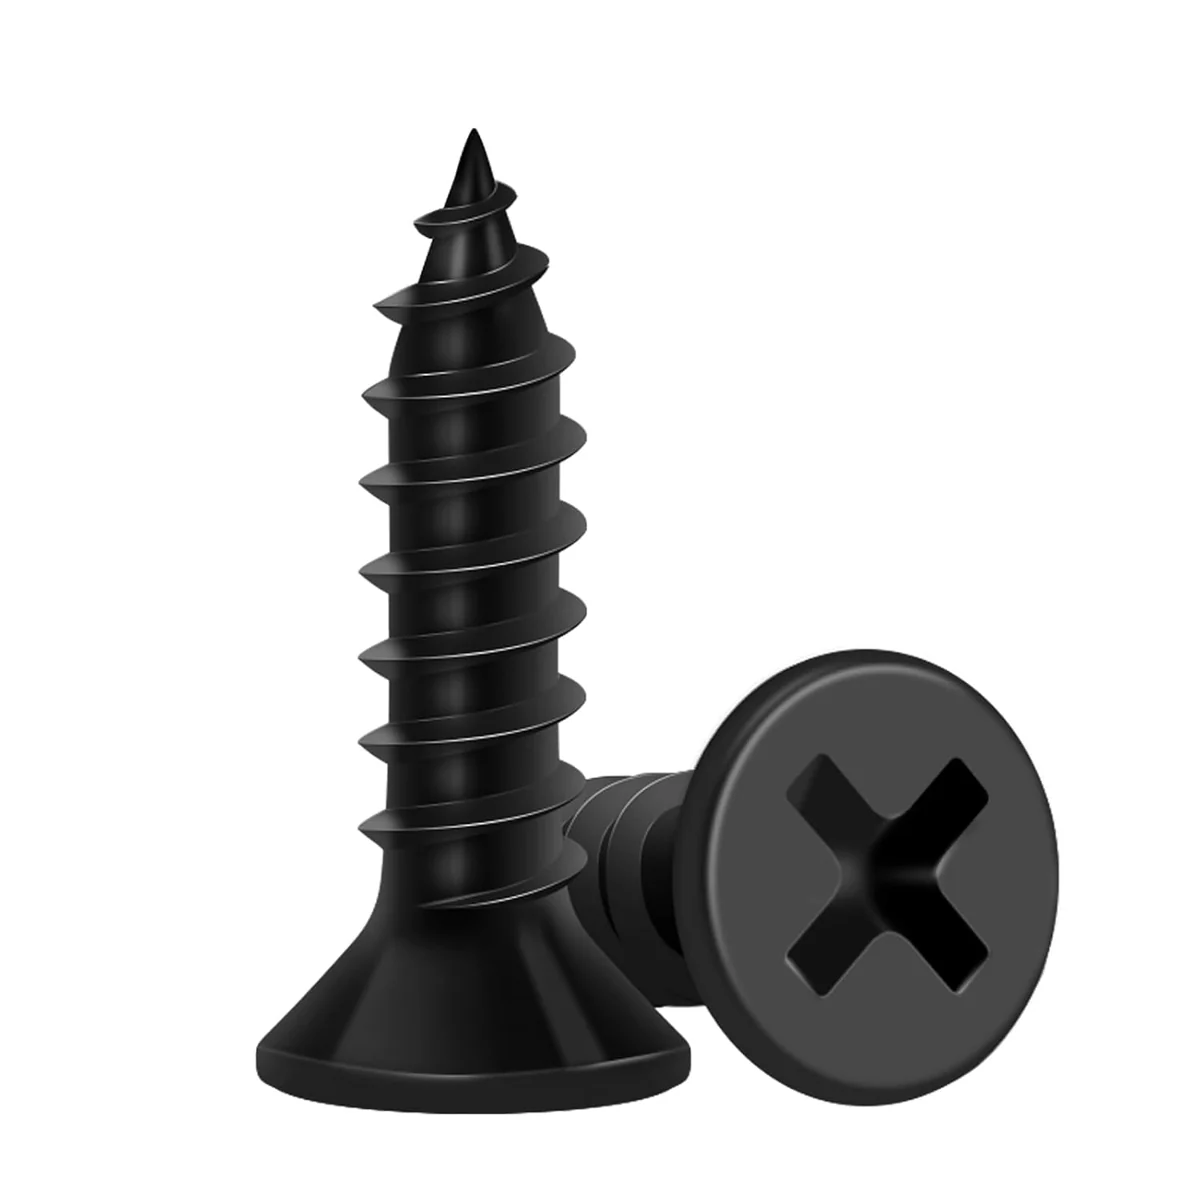
FIXLINK Number-6 Short Wood Screws
These FIXLINK number-six wood screws have a short five-eighth-inch length. Their flat heads provide a compact fastening format for thinner wooden parts and hardware.
View on AmazonFor the long-screw example, the useful next questions concern timber thickness, diameter, threaded reach and the manufacturer's intended applications. For the short #6 example, the immediate checks include the thin assembly's available depth and the head's fit against the surface or hardware. The labels direct the comparison toward different parts of the joint.
Buying by a familiar number alone loses this distinction. A size #6 screw can be sold in several lengths. A six-inch screw can be sold in several diameters. A search result showing a long construction fastener beside a small cabinet screw is therefore understandable: the search may be matching one part of the label while ignoring the other.
Write a complete shopping line before opening a retailer page. For example, identify the numbered diameter, required length, head, drive, material and finish, then add the intended application. For a replacement, include the original hardware model. For a new joint, keep the measured stack of materials beside that shopping line.
Compare assortments by their contents table. A large total piece count can conceal only a small quantity of the length your project repeats. Read the quantity for each compartment and compare it with your fixing layout. An assortment search is useful for seeing formats, while the individual listing establishes what a particular box contains. Keep anchors and other included hardware on separate lines from the wood screws themselves.
The distinction also helps when sorting leftovers. Keep long timber screws apart from small hardware screws, then divide each group by full size and model. An organizer labeled simply “six” invites confusion. A label reading “#6 × 5/8 inch, flat head, Phillips” gives you a useful starting point the next time that compartment is opened.
Choosing the Right Length for Your Project
Choose length from the assembled joint. Measure the outer component, include any bracket or washer in the stack, and identify how much receiving material is available. Then compare the screw's actual head-to-tip geometry with that section. The goal is enough appropriate thread engagement for the connection while keeping the point within the intended space.
A simple geometry example makes the process clear. If a conventional flat-head screw sits flush in a half-inch outer panel, a one-inch overall screw reaches approximately another half inch beyond that panel. That remaining reach includes the screw tip. It does not mean half an inch of full-diameter thread. Mark both the tip position and the threaded portion when examining a close-fitting joint.
Repeat the measurement after adding hardware. A washer beneath a suitable noncountersunk head changes the stack. A recessed bracket changes where the head bears. A pocket-hole screw follows an angled path. A recessed wooden surface can change the position of a countersunk head. Use the actual assembly instead of subtracting two nominal package dimensions.
Consider a small cabinet bracket attached to a wooden rail. First measure the rail at the proposed fixing, then measure the bracket at its hole. Place the actual bracket against an offcut and compare the proposed screw's bearing surface with the hole. Mark the available receiving depth from that surface. This simple stack check reveals the tip position and whether the screw's threaded section reaches the intended wood. Repeat it for the other side of the bracket if the adjoining component has a different thickness.
My drawer record shows that approach across several layers:
- Six-inch screws joined the timber pieces into the storage-bin drawer box.
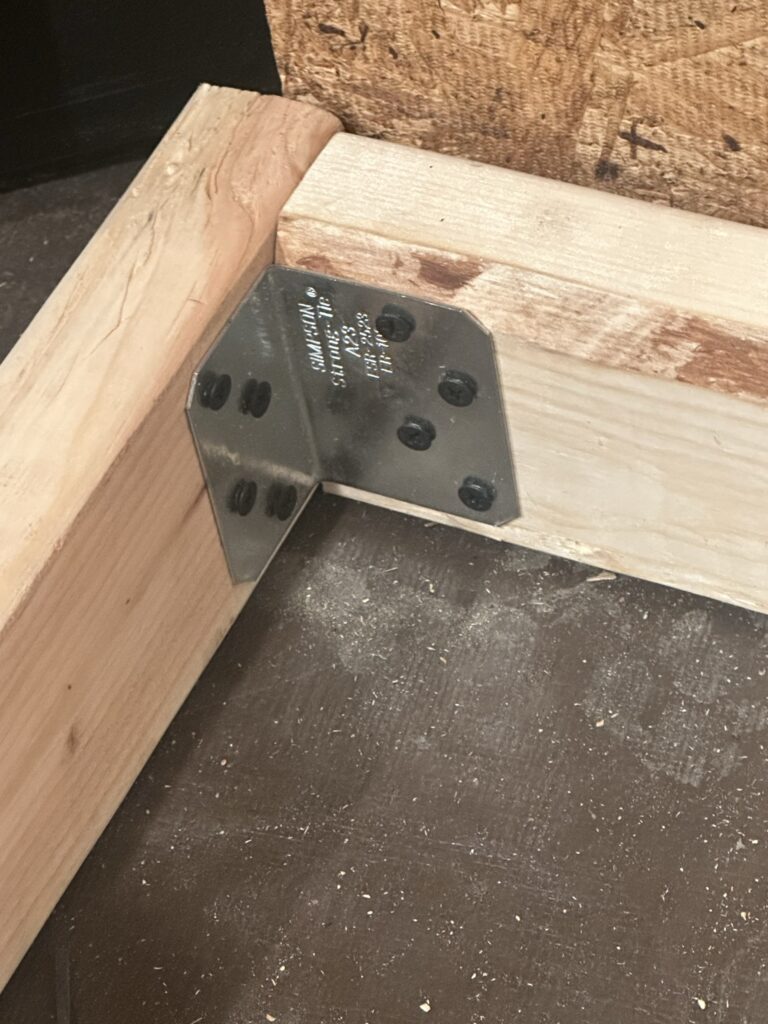
- One-inch screws attached the galvanized right-angle brackets inside the frame.
- One-and-a-half-inch screws attached the plywood base to the timber box.
- Half-inch screws and flat washers attached rubber matting to the plywood.
These are the lengths recorded for that project. For another drawer, begin again with its measured timber, sheet material and hardware. Even a visually similar design can change when the plywood thickness, bracket position or screw head changes. A small section drawing is quicker to revise than a completed panel with misplaced fastener points.
During a dry fit, hold the selected screw beside the joint and mark the intended path on scrap. Check where the threaded section begins, where the head will stop and where the tip will end. This turns “long enough” into a visible dimension. Save the successful sample or its measurements with the cut list for the remaining repeated joints.
Applications of Wood Screws
Screws for Wood Furniture
Choosing screws for wood furniture brings appearance, movement and access into the same decision. A visible fastener may need a clean, flush seat. A concealed bracket may need a broad bearing head. A removable panel may need repeated access. Begin by describing how the furniture will be assembled and used, then choose the fastening arrangement that supports those details.
For a cabinet or shelf, distinguish joining the wooden parts from attaching the hardware. A slide screw must suit the slide's hole and available travel space. A hinge screw must let the hinge close as intended. A screw joining two wooden members must suit their thickness, material and layout. Keeping separate lines for these jobs makes a shopping list much more useful.
My storage-bin drawer combined several of these furniture-style problems. The timber box established the shape, the panel formed the base, and the slides created movement relative to the cabinet frame. Rubber matting added another layer. The same assembly therefore needed long timber connections, shorter panel fixings and hardware attachments. One box of long screws would have addressed only part of the work.
For solid-wood furniture, consider how the proposed attachment accommodates changes across the wood's grain. Match tabletop clips, slotted brackets or other movement hardware to their own instructions. For a plywood assembly, examine panel thickness, edge locations and the intended fastening pattern. The material and the joint arrangement determine the details worth checking.
Repair work begins with the existing hole and hardware. Identify the original screw before selecting a replacement. If a wooden hole has lost its grip, evaluate the repair and receiving material together. A longer screw changes the tip location; a larger screw changes the hole and head fit. Treat either change as a revised connection with fresh measurements.
A removable cabinet back presents another useful decision. Draw its perimeter support and mark which screws will be accessible after shelves and drawers are fitted. Compare the panel thickness with the support depth, then decide how the heads will appear on the finished face. If the design uses threaded inserts, record the insert model and matching machine thread. This gives the access panel a defined fastening system and keeps its removable hardware distinguishable from nearby wood screws.
Plan the last assembly steps before fixing the first part. Drawer slides often need access while the cabinet is open, and a finished panel can hide earlier screws. Lay the parts out in their intended sequence and identify which heads remain reachable. For furniture that may move or be modified, record the removal sequence along with the fastener sizes.
Finally, make the visible result part of the sample. Try the selected countersink, head and finish on an offcut. Look at it under the same light as the finished furniture and check that surrounding hardware clears it. A short sample can settle both the technical fit and the appearance before the repeated work begins.
Using Screws in Structural Applications
Structural applications require a connection specification that ties the fastener to the materials and layout. Begin with the exact screw model and its published application information. Identify the wood members, connection direction, fastener spacing, edge and end distances, installation method and relevant load table. Those details work together as the connection description.
Simpson Strong-Tie's exterior fastener range distinguishes structural screw families, connector screws and decking products. This is a useful way to organize research: find the intended connection first, then the product documentation for that connection. A connector's designated screw and a long timber screw serve different interfaces even when both appear in an exterior wood-screw catalog.
When comparing a structural fastener, save its model number and the dated document used for selection. Highlight the relevant material combination and installation conditions. Record the required number of fasteners and their positions on the drawing. A complete record makes later inspection, additions and like-for-like replacement more straightforward.
Diameter and length still matter, but the comparison also includes the manufacturer's connection data. Products with similar dimensions can have different materials, geometry and application tables. Match the documented model rather than using a visual resemblance as the selection method. For connectors, follow the connector maker's designated fastener schedule and hole-use pattern.
For vehicle projects, keep the timber joint and the attachment to the vehicle as separate design questions. A storage frame can contain many wood-to-wood joints while its mounting interfaces involve different materials and requirements. Label each connection in the drawing so the fastener list remains specific to the component it joins.
My Day 106 entry is most useful here as a record of fabrication: the patio layout, drilled timber box, corner brackets, plywood and slides. The diary marks the roof-storage project in progress and lists continued work for the following day. In this guide, the photographs explain that assembly sequence and the different fastening jobs within it.
A useful structural shopping list therefore starts with the connection detail and ends with the package. Carry the model, dimensions, finish, quantity and installation document together. That makes the selected screw traceable to the intended job throughout ordering and assembly.
Best Practices for Screw Fixings for Wood
Good screw fixings for wood begin before the driver turns. Establish the finished alignment, mark the fixing positions, prepare the holes and bring the parts into contact. The screw then secures a joint that has already been arranged. This sequence reduces the temptation to use tightening force to correct parts that were never positioned properly.
- Lay out the joint. Mark the centerlines and edge distances from consistent reference faces. Include the hardware's intended holes and the path of moving parts.
- Confirm the fastener. Read the complete label, compare the screw with the section drawing and select the matching driver bit.
- Prepare a sample. Use an offcut with the same material and thickness. Examine the pilot, clearance hole and countersink as separate features.
- Clamp the assembly. Check the faces, corners and overall dimensions while the parts are held in their intended position.
- Drive with control. Keep the bit aligned with the screw and stop at the intended head position. Check the first connection before repeating it.
- Inspect the completed detail. Look at seating, panel contact, screw-tip position and hardware movement. Record the selected screw and preparation for the next repeated joint.
The sample stage is especially helpful when the wood or finish changes. A hole that worked in one material may need a different preparation in another. Compare the result with the selected fastener's instructions, then keep the successful drill and driver settings with the work. For a repeated run, consistent preparation usually saves more time than rushing the first installation.
If a sample leaves a gap between parts, examine when it appeared. Check whether the pieces were touching before driving, whether threads engaged the outer piece, and whether the head seated before the joint closed. If the head damages the surface, compare the countersink, bearing area and final driver setting. Work through one variable at a time on another sample. A small, observable change makes the result easier to understand than changing the screw, bit and hole preparation together.
Pay attention to the driver as well as the screw. Choose the bit profile and size that fit the recess fully. Replace a worn bit before it damages a repeated set of heads. Keep the working angle clear so the bit can remain aligned. If access will disappear behind a panel, complete and inspect that connection before closing the assembly.
Use the organizer as part of the workflow. Label compartments with the full size, head, drive and model, and return unused screws to the matching compartment. Put unidentified leftovers aside until their dimensions are established. Keep spare bits next to the sizes they fit. At the end of a session, photograph the joint and its parts label together for your own project record.
For a drawer, finish by operating the complete assembly through its travel and checking clearances around the fasteners. For a removable panel, confirm the removal route. For a visible surface, inspect the head positions before applying the next finish layer. Each check answers a practical question about the particular joint you have just made.
Conclusion
Summary of Key Points
The right wood screw is a match between the connection and the fastener's complete specification. Start with the materials, the measured assembly and the receiving wood. Then choose diameter, length, head, drive, material and finish together. For a documented structural connection or proprietary hardware system, keep the exact model and installation information with that choice.
The most easily confused labels describe different dimensions. Six-inch wood screws identify length. Size #6 identifies a diameter designation. A short #6 screw and a long timber screw can both be useful in one workshop, but their jobs and measurements differ. Read the full label every time, especially when buying a replacement or sorting an assortment.
My storage project gives those distinctions a physical setting. The diary records a timber box, galvanized corner brackets, plywood base, rubber matting and drawer slides. Each layer brought its own attachment depth and bearing detail. The photographs show why the project called for several lengths instead of a single universal screw.
Preparation completes the selection. A pilot hole, a clearance hole and a countersink serve different purposes. A matching bit, clamped alignment and a sample joint make the chosen detail repeatable. Keeping the product label and measured setup turns a successful first connection into a useful reference for the rest of the work.
Final Tips for Selecting Wood Screws
Before your next purchase, write down one complete connection. Name the attached piece, the receiving material, the measured thicknesses and the intended head position. Add the proposed screw specification and sketch where its tip will stop. This small exercise turns a vague search for “wood screws” into a focused comparison.
Next, separate repeated jobs from one-off details. A drawer may need many identical base fixings and only a few bracket screws. Buy each size according to the actual layout, then keep a modest labeled reserve for later adjustments. A well-organized selection is useful because you can identify it, measure it and reproduce the joint when the project changes.
Make the parts record easy to read months later. Include a photograph of the package, a joint sketch, the selected hole preparation and a short note explaining the head choice. For repeated cabinet parts, give each connection a letter on the drawing and use that letter on the hardware list. When a panel changes thickness, you can immediately find which screw selections need another look.
For an unfamiliar fastener, open the manufacturer's product information before ordering. Check the intended material, head dimensions, drive size, hole preparation and finish. For hardware, compare the screw directly with the hinge, slide or bracket specification. Save the relevant document with the drawing so the shopping decision remains connected to the installation detail.
For practical examples from my own kit, visit the Fasteners & Mounting collection. The FMhotu six-inch screws and FIXLINK short #6 screws make the length-versus-diameter distinction easy to revisit. My original storage-build entry brings together the project sequence and photographs.
Use those examples to sharpen your own measurements. Choose the screw for the joint, confirm the setup on matching scrap and keep the successful detail with the project. Whether you are building furniture, organizing workshop storage or fitting a wooden cabinet, a clear fastening record makes the next step easier.