Method Race Wheels MR701 And BFGoodrich All-Terrain T/A KO2 Tires
I ordered my Method Race Wheels MR701 wheels on Amazon and paired them with BFGoodrich All-Terrain T/A KO2 tires. My footage shows the change from the original silver wheels to the finished wheel-and-tire setup.
The change is easy to see in those recordings. The black wheels sit against the van’s white body and dark lower trim, while the tires bring a much more pronounced tread pattern. Here is the project as I documented it, from the original setup to the finished result.
My Transit Before and After
I started by filming the van from outside, walking around it to show the stock wheels on both sides. After the change, I went around it again and moved closer to the new wheels and tires. Putting the two views together makes the difference much easier to appreciate than looking at a product photograph alone.
| What Changed | Original Setup | Installed Result |
|---|---|---|
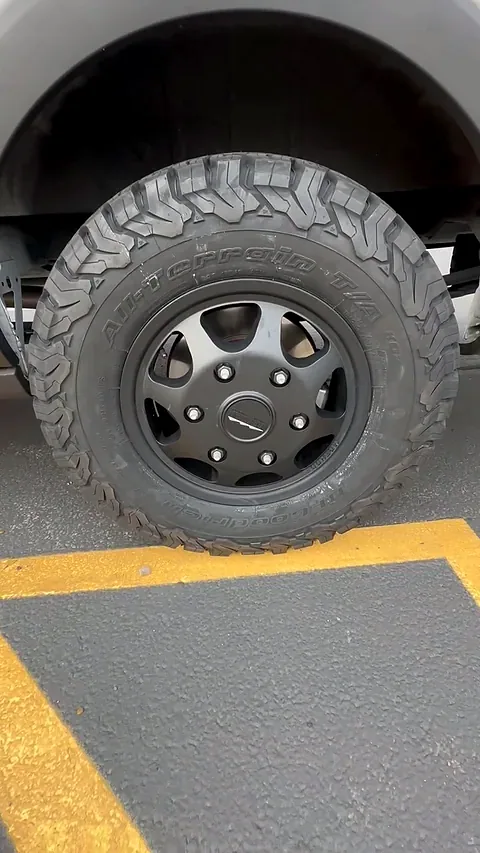
| Wheel appearance | Silver steel wheels with small round openings. | Matte-black Method MR701 wheels with larger openings and Method center caps. |
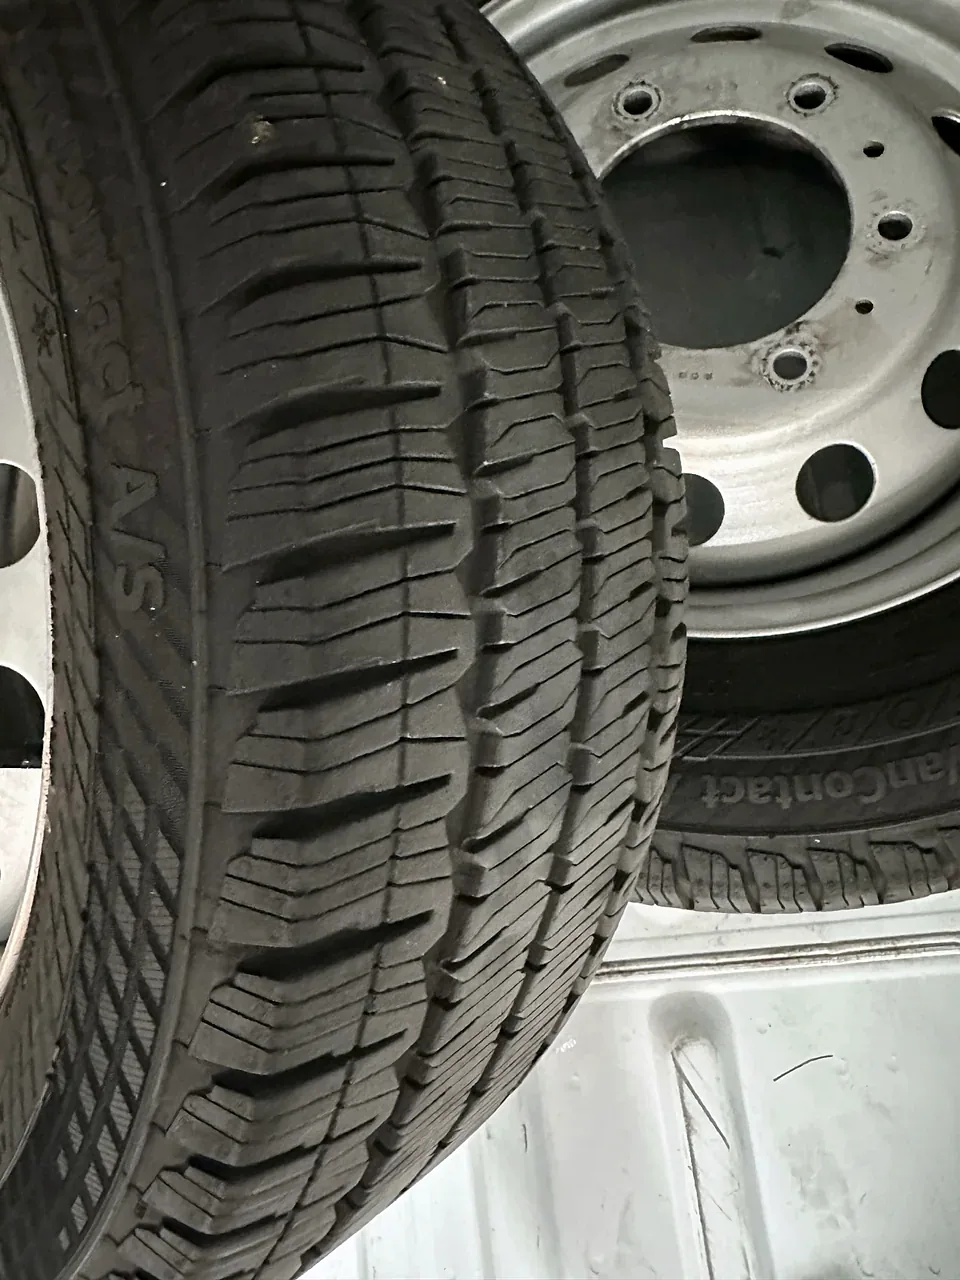
| Tread appearance | The close-up photos show the stock tires’ narrower grooves and closely spaced tread elements. | The after footage shows more prominent tread blocks and a pronounced shoulder pattern. |
| Van’s side profile | The bright wheels stand out against the black lower trim. | The black wheels create a darker wheel-and-tire area beneath the white body. |
Introducing the Wheel and Tire Change
I introduced the project on camera beside the van before taking it to the shop. My plan for the recording was straightforward: show the stock wheels and tires, then show what I was changing them to. That opening gives the before-and-after footage its context.
Method Race Wheels MR701 + BFGoodrich All-Terrain T/A KO2 Tires on My 2023 Ford Transit — Landscape
Method Race Wheels MR701 + BFGoodrich All-Terrain T/A KO2 Tires on My 2023 Ford Transit — Portrait
The Original Wheels and Tires
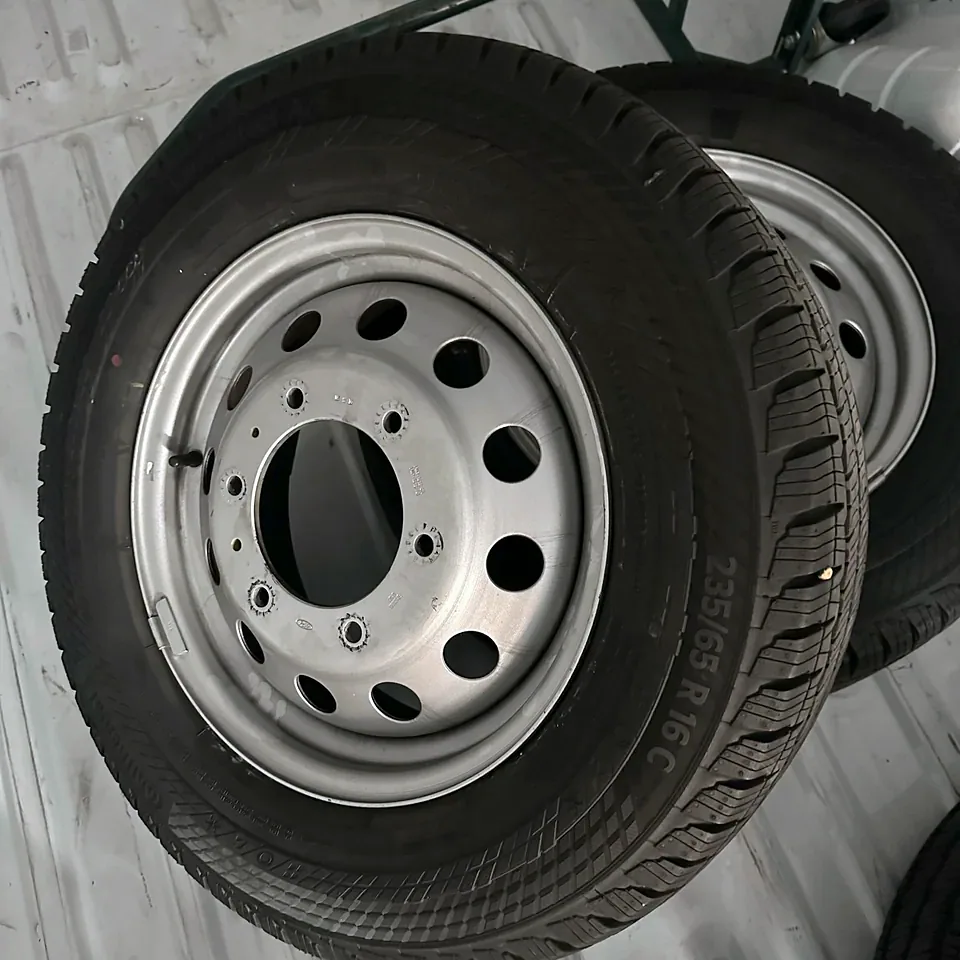
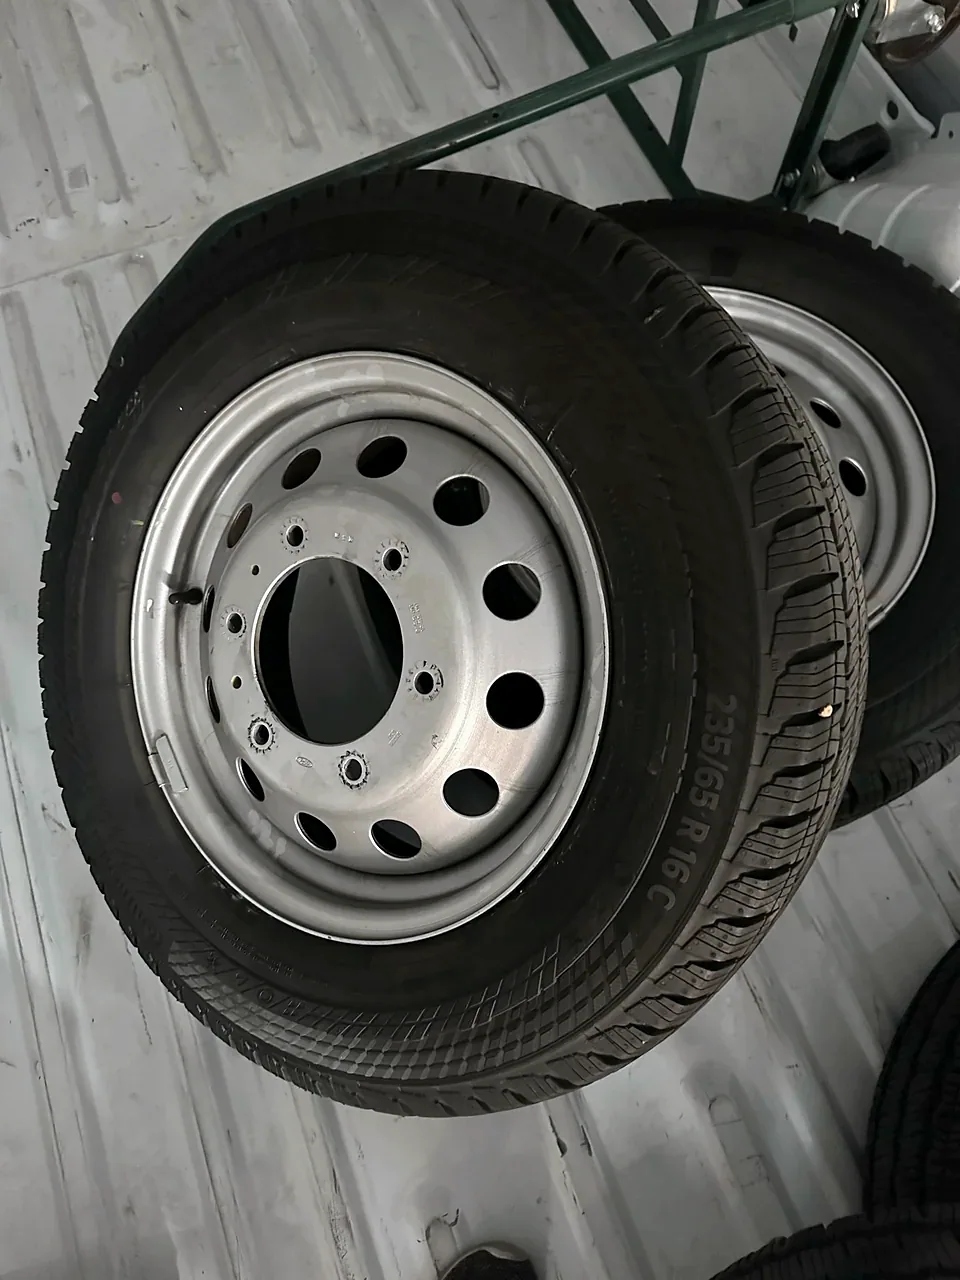
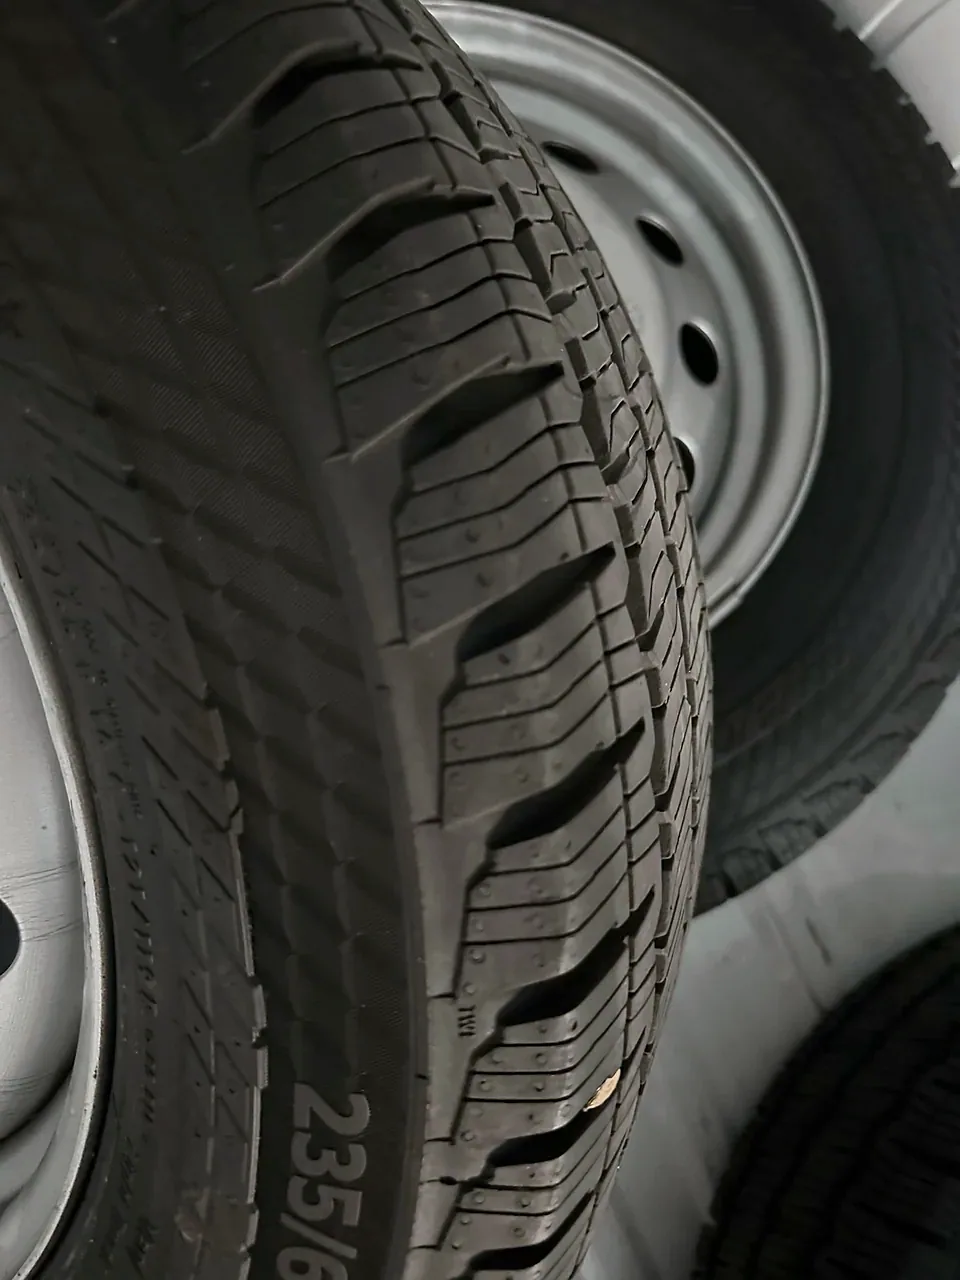
The original setup had the familiar silver steel-wheel appearance. My photographs of the removed assemblies show the wheel faces, center openings, valve stems and the tires that came off the van. One close-up also records the original tire’s 235/65 R16C sidewall marking.
I kept several views of the old tires in the project record. The face-on wheel photograph makes the original silver finish clear, while the tread photographs show the pattern across the center and shoulder. They provide a useful visual starting point for comparing the stock assemblies with the BFGoodrich tires shown later.
The Matte-Black Method MR701 Wheels
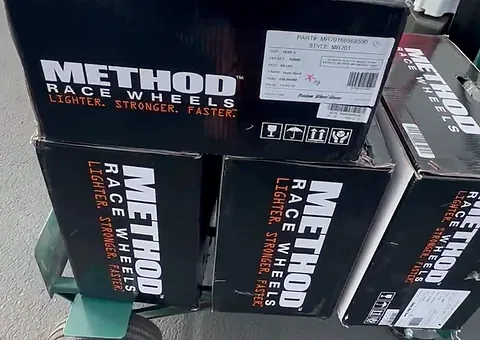
Before the change, I showed the Method Race Wheels boxes on a green hand truck beside the Transit. I identified the new wheels in the recording as matte-black MR701s. The packaging also carries the MR701 model identification.
The wheel boxes appear again in the shop photograph, stacked beside the front of the van. In the installed close-ups, the black wheel faces and Method center caps complete the connection between the boxed wheels and the finished setup.
For the wheel purchase details and a comparison with the MR703 and RTX options, see my Method MR701 product page.
At the Tire Shop
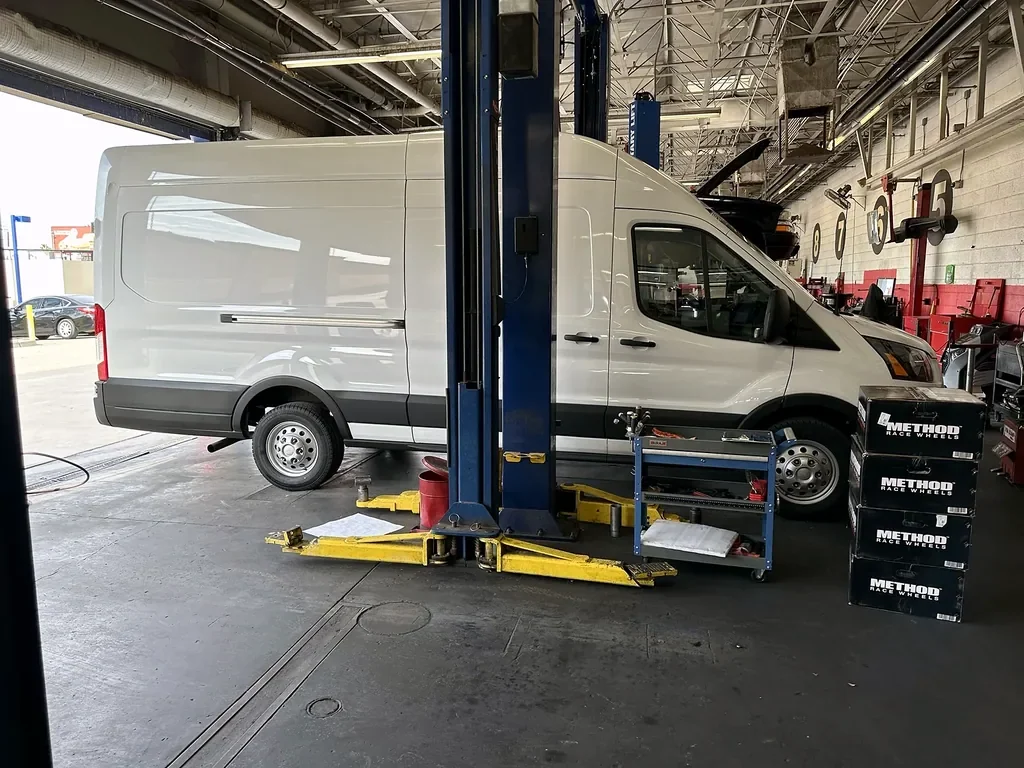
My service-bay photograph captures the project between the two outside walkarounds. The van is inside with its original silver wheels still on, and the four Method boxes are stacked beside it. The view includes both ends of the van, so it is also a useful record of the stock setup before the finished result.
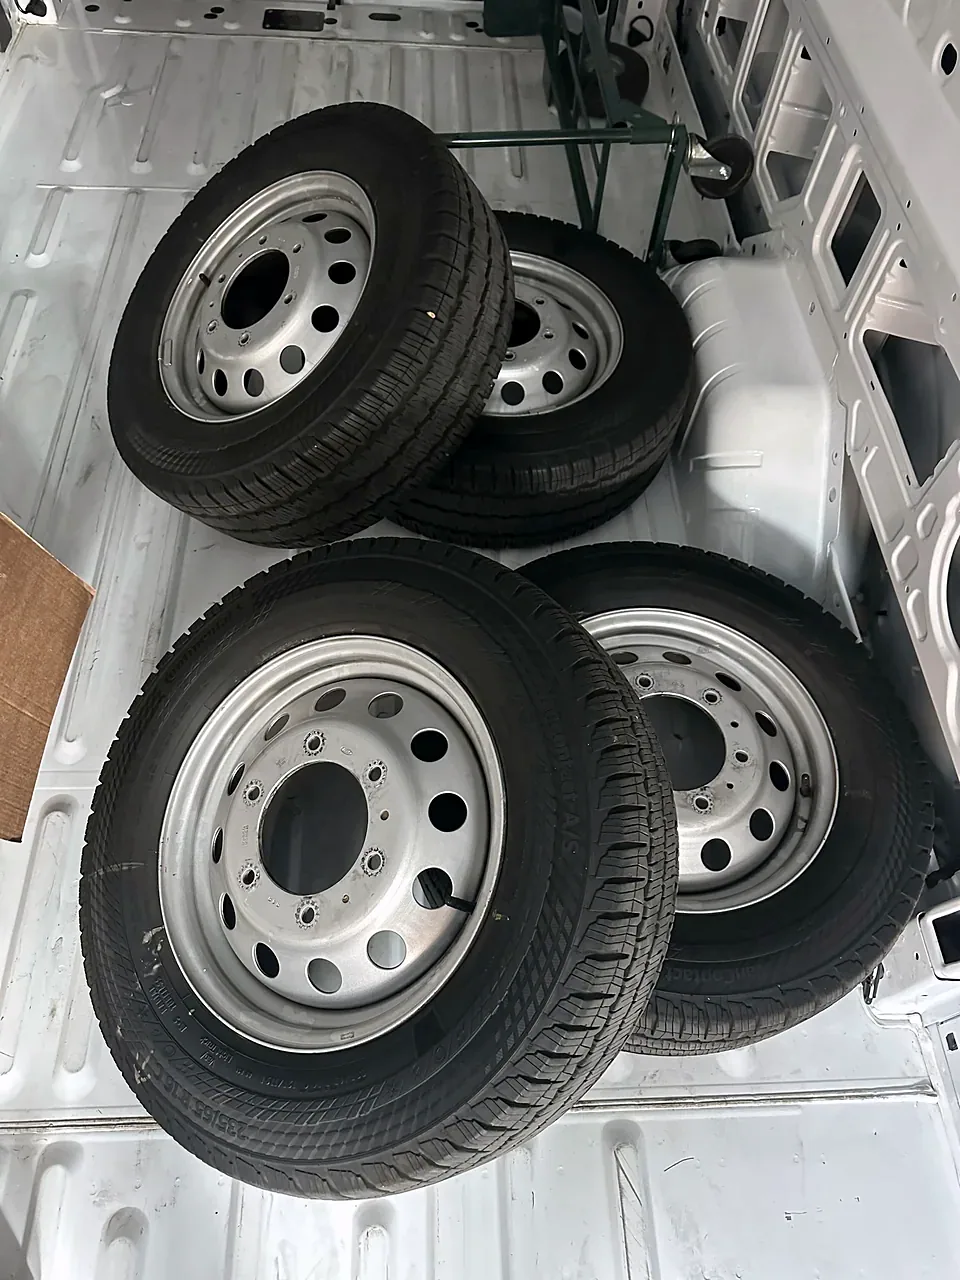
After the change, I photographed the four removed wheel-and-tire assemblies inside the cargo area. The bare interior and the green hand truck are visible around them. Having all four assemblies in the same photograph makes this part of the project especially clear: these are the original wheels that came off my van.
The Installed Method and BFGoodrich Result
With the new setup fitted, I filmed the Transit again. I began with the overall side profile, moved toward the rear wheel and tire, then showed the front wheel before stepping back for another look at the van.
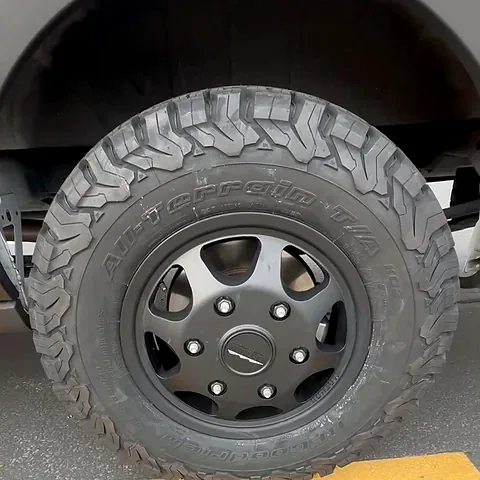
The close-up makes the BFGoodrich and All-Terrain T/A sidewall branding visible. It also shows the pronounced tread blocks around the shoulder and the black Method wheel face. The difference from the removed stock assemblies is particularly noticeable when the tread photographs are placed alongside this view.
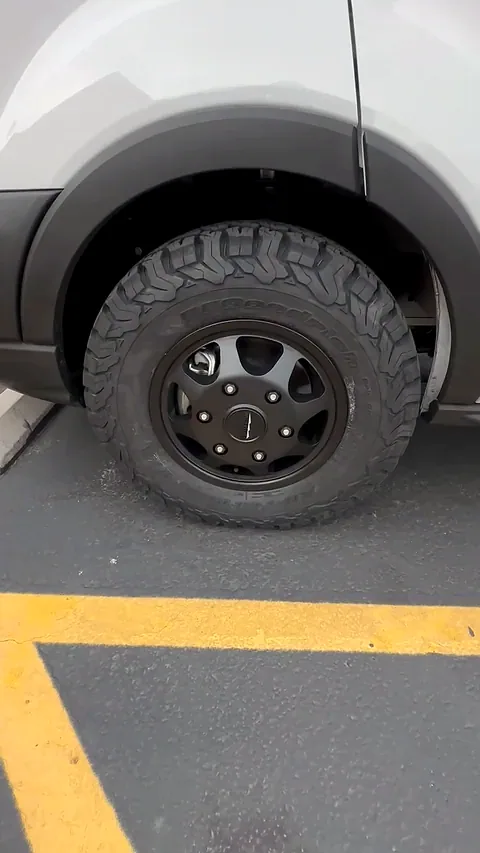
For the KO2 purchase specification, my sidewall photograph and the Gripmax and KM3 comparisons, see my BFGoodrich KO2 product page.
My Reaction to the New Look
My immediate reaction was about the appearance: I was very happy with the new look. In the after recording, I drew attention to the tires, their more aggressive-looking tread and the wheels, then stepped back to show the whole van again.
That wider view shows the change in context. The close-ups show the individual parts, while the side profile shows the combination on the van. The matte-black wheels work visually with the dark lower body trim, and the tread pattern gives the wheel-and-tire area a much more substantial look.
What Stands Out in My Before-and-After Photos
For me, this project has three especially useful views: the original silver wheel with its tire marking, the Method boxes at the shop and the installed BFGoodrich-and-Method close-up. Together, they show the starting point, the equipment and the result.
The two walkarounds let me compare the original setup with the finished van, and my reaction is part of the same project record. The visible transformation—from silver steel wheels to matte-black MR701s and a more pronounced tire tread—is what stands out in these build photographs.
Another View Of The Original Tread
For another exterior project, read U-POL RAPTOR Black Urethane Bedliner Kit Project, including the uneven sprayed sheen, actual roller correction and daylight result.
Follow more projects in my build diary, or browse the vehicle equipment in my Tools & Materials hub.
Read the Project Diary
My project diary records the work, photographs and videos behind this project.
Give Each Wheel-And-Tire Photograph A Specific Job
A useful wheel-and-tire comparison needs more than two attractive pictures. Begin with the overall van before the change, then identify the original assembly in a closer view. The wide view establishes the side profile and the relationship between wheel color, body and lower trim. The close view records the wheel face and visible tire markings. Together they describe the starting point more clearly than either image can alone.
The Method boxes serve a different purpose. In my footage, I identify the matte-black MR701 wheels while showing the packaging beside the Transit. The shop photograph places those boxes next to the van with its original wheels still fitted. That connects the purchase introduction to the work stage. It is useful context for the project, while the installed close-up remains the view that shows the resulting wheel face on the van.
The removed stock assemblies are another distinct part of the sequence. My cargo-area photograph shows all four together after removal. The separate sidewall close-up preserves the original 235/65 R16C marking. Keep that photograph associated with the original assembly. A readable marking from the removed tire should not be carried into a description of the newly installed tire merely because both images belong to the same project.
Use the installed close-ups to examine the visible Method center cap, wheel openings and BFGoodrich branding, then step back to the final side profile. The close views explain the parts. The wider view explains the visual change that prompted my recorded reaction. Returning to both scales keeps the comparison tied to the actual Transit rather than turning the page into a collection of unrelated catalog photographs.
When organizing a similar project record, label the role of each image: original profile, original detail, purchase packaging, work stage, removed assemblies, installed detail and finished profile. You do not need a large gallery if a smaller set answers those questions. Keep the original files and their order so a later caption change does not separate a photograph from the stage it documents.
Keep Wheel And Tire Purchase Details In Separate Records
The wheel and tire are two products in one visible assembly. My wheel order was through Amazon, while the retained tire purchase histories are from Tire Rack and Discount Tire. Keep those histories separate even when the photograph shows both products together. A current shopping link can help someone compare an available option, but it does not replace the original account of where my parts came from.
For the wheel record, retain the Method MR701 identity and the historical specification already shown in the product section. Keep that specification attached to its evidence rather than expanding it from the appearance of the installed wheel. The model name, finish and size-related fields each have their own role. A black wheel with a similar face is not enough to identify every part of a particular configuration.
For the tire record, keep the KO2 identity, purchase evidence and the photographs showing the relevant markings together. The original stock-tire photograph is part of the before record. The installed BFGoodrich photograph belongs to the after record. A clear filename or caption that identifies which assembly is shown helps prevent those two sets of information from being merged when the page is updated later.
Keep current alternatives in their own comparison rows. The MR703 and RTX options on this page are not the MR701 purchase, and the Gripmax and KM3 tire options are not the KO2s used in my project. Their matching product images and descriptions explain what is being compared. Preserve those distinctions when following a current offer so the page continues to document my actual build.
A useful private parts record has separate fields for product identity, original seller, purchase document, current destination and the photograph supporting an installation observation. This structure is especially helpful when an old listing changes or disappears. The build history stays intact while the current shopping option can be identified accurately without rewriting the original wheel-and-tire story.
Make The Before-And-After Views Easier To Compare
Start with photographs that answer the same visual question. A full-side before view and a full-side after view show the van's overall appearance. A face-on wheel detail and a similar installed detail show the wheel-face design. Comparing a wide van photograph with a tightly cropped tread photograph mixes two scales and makes it harder to judge what actually changed.
Keep the van body and lower trim visible in the profile comparison. On my white Transit, the original silver wheels stand out differently from the matte-black Method wheels. That relationship is part of the result I liked. Cropping away the body would leave a wheel comparison but lose the visual connection to the black lower trim and the rest of the exterior.
Use tread photographs to describe the pattern visible in those photographs. My stock-tire images show closer-spaced elements, while the installed views show more pronounced blocks and shoulder detail. Those are visual observations. The project recording centers on the changed appearance and my reaction, so the comparison should remain tied to those recorded points rather than adding driving measurements that were not part of the film.
Keep image proportions intact. A wheel-and-tire assembly is particularly easy to distort if an image is stretched to fill a card. Use a responsive image that keeps its native aspect ratio, and distinguish an enlarged crop from the full view. This lets the viewer understand what is a close detail and what shows the assembly's relationship to the whole van.
Photograph labels can do much of the organizing work. “Original assembly after removal” and “installed rear wheel from the after walkaround” locate the images in the sequence without making the reader infer their order. Keep the wider comparison next to the details so the wheel face, tread and body profile remain parts of one coherent project.
Plan The Shop Stage As Part Of The Conversion
A project carried out at a shop still needs a place in the build record. Define which parts you are supplying, which work is included in the agreed scope and what documents you want to keep afterward. My shop photograph is the transition between the original outside walkaround and the installed result. It records where the boxed wheels and the stock assemblies entered that sequence.
Keep the exact vehicle and proposed parts information together when discussing the work. Record the actual configuration and the documentation associated with those parts, rather than relying on a photograph of another Transit. The product pages linked from this article preserve my purchase references and current comparisons. They provide a more specific starting point for identifying the parts than a general description such as black van wheels.
Decide how the removed assemblies will be recorded and stored as part of the project handoff. My photograph shows all four in the cargo area after the change. That image became useful later because it preserved the original setup alongside the new one. Keeping the removed-parts record also helps separate what came off the van from new products photographed at the same time.
Allow space in the build notes for the shop paperwork and the follow-up items actually supplied with the job. Keep those records with the relevant product documents instead of trying to turn a short appearance video into the whole work record. The written project can then link the before view, shop stage and after view while leaving the detailed service information easy to retrieve.
This fits a mixed conversion approach: some jobs are custom fabrication, some involve purchased components and others include outside work. My wheel-and-tire project belongs beside the running-board and bedliner projects as another exterior change, but its work sequence is different. Record the scope of each job separately so the overall build list does not confuse a shop appointment with a bench-fabrication session.
Read My Finished Walkaround Alongside The Other Exterior Projects
My reaction in the final recording is direct: I was very happy with the changed look. I moved close to the tires and wheels, then stepped back to show the van again. That movement is worth preserving because it connects the detail I was discussing to the overall appearance. The short before-and-after clip is the fastest route through the change; the full film adds the introduction and my reaction.
The lower trim provides a useful visual reference across the exterior projects. The matte-black wheel faces sit below the white body and dark lower section, while the passenger-side running board follows the doorway beside them. These are separate installations with their own photographs and purchase records. Looking at them together explains the side profile without combining their technical details.
Use the original project diary when you want the shortest written route through the wheel change, and use this page when you want the packaging, stock details, shop stage and installed views together. The product pages answer the separate purchase and alternative questions. Keeping those roles clear makes the navigation useful rather than repeating the same account at every destination.
For a final project note, record the installed product identities, the photograph showing the overall result and the location of the purchase and shop documents. Keep my appearance-based takeaway alongside the film rather than replacing it with generic claims about what a wheel upgrade should achieve. The value of this project is the visible transformation on my Transit and the original sequence that documents it.
Compare Wheels And Tires As Separate Choices
The alternatives on this page are easier to use when they are divided into two comparisons. The MR703 and RTX entries are wheel alternatives to the recorded MR701 purchase. The Gripmax and KM3 entries are tire alternatives to the KO2. A wheel photograph and a tire photograph describe different parts of the assembly, so each needs its own identity and evidence beside the current destination.
For the wheel comparison, keep model, finish, listed dimensions and the mounting-related fields in separate columns. The existing product cards show that the MR703 and RTX descriptions differ from one another. Use the actual current product reference for each row. Do not merge a field from one alternative into another merely because both options are black wheels photographed against similar backgrounds.
Compare the wheel-face design with the relevant product image, then return to my installed MR701 close-up for the build reference. The appearance comparison can help explain a preference, but the chosen product still needs its own exact specification record. My shop photograph and Method boxes document the original project; they are not photographs of either alternative being installed.
For the tire comparison, begin again with a separate table. Keep the full model name, listed size and service-description fields associated with the matching tire. The Gripmax and BFGoodrich KM3 entries have their own descriptions on this page. Their presence supplies options to investigate without changing the identity of the KO2 tires shown in my after walkaround.
Use the photographed tread and shoulder as visual information. A tread image helps show how the listed products look, while the product documentation supplies the specification fields for the exact item. Keep those sources side by side instead of treating the visual impression of a large tread block as a complete technical comparison. That also keeps the page aligned with my original footage, which records appearance and my reaction.
Keep the wheel decision and tire decision connected in the project folder, but do not turn them into one combined product name that loses the individual references. A useful cover sheet identifies the vehicle, the proposed wheel, the proposed tire and the documents used for each. The separate purchase records can then remain attached to their own components while the overall project record explains the assembled result.
When comparing total scope, identify which parts and work belong to each current quote or offer. A product-only destination and a shop job are different entries in that record. Keep the actual quoted inclusions visible rather than assuming every displayed wheel or tire price represents the complete change. My sequence includes both the parts introduction and the shop stage because those were separate parts of the project.
Finally, preserve the historical choice when the shopping options change. The MR701 and KO2 remain the products in my recorded Transit project. A later comparison can identify another available wheel or tire with its own image and source, while the before-and-after film continues to show the original transformation. That is the clearest way to keep a useful buying reference beside a genuine build record.
The Product I Bought
I bought the Method MR701 wheels on Amazon and paired them with BFGoodrich KO2 tires. The two products have separate purchase histories and matching product images below.
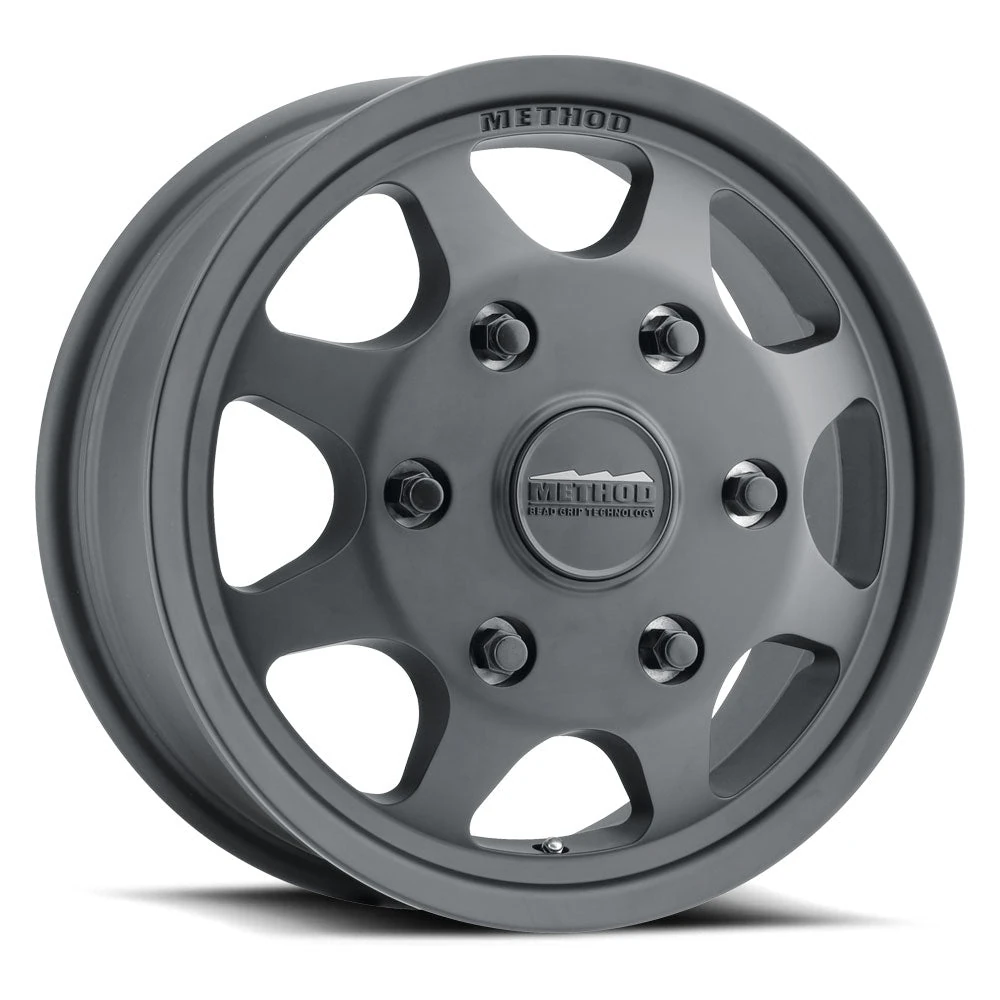
Method Race Wheels MR701
My build footage shows matte-black Method MR701 wheels replacing the Transit’s silver steel wheels. The historical purchase record identifies the sixteen-by-six-and-a-half-inch, six-by-180, positive 90 mm version.
View On Amazon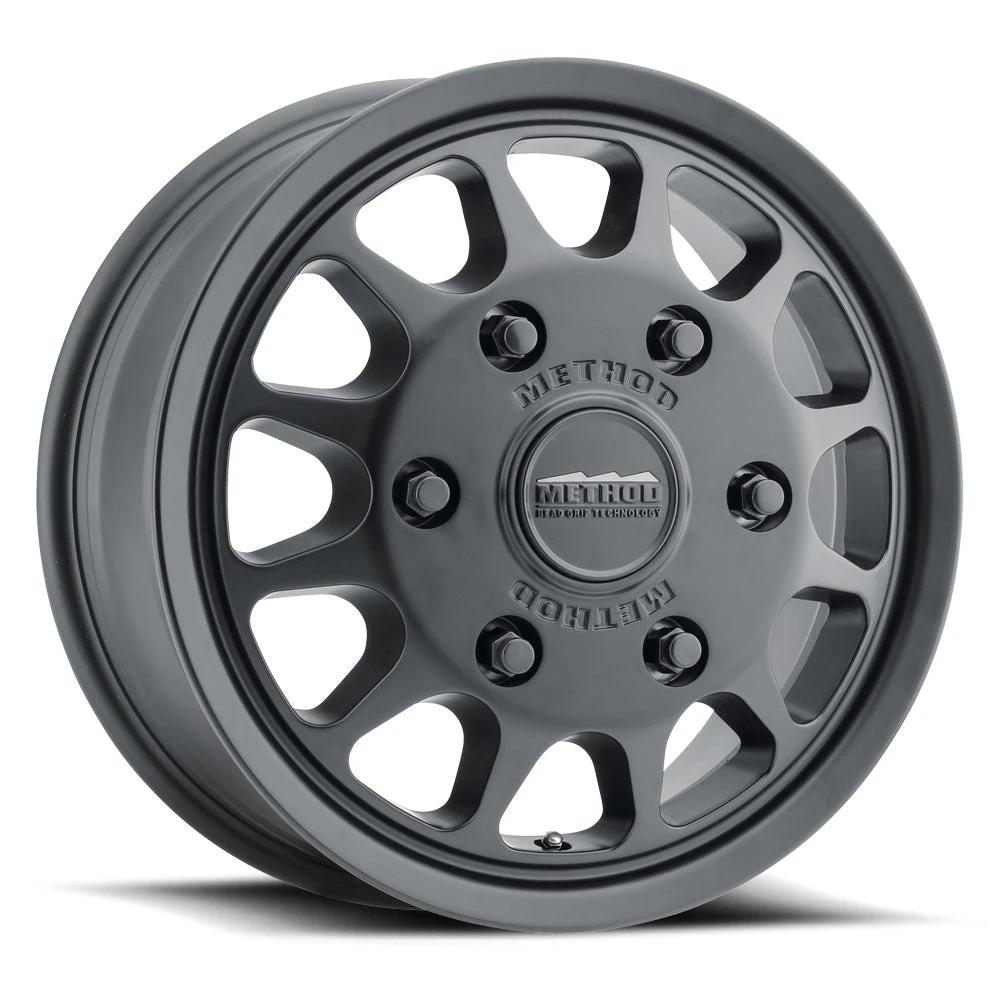
Method MR703 Matte-Black Wheel
The Method MR703 listing specifies a matte-black 16-by-6.5-inch wheel with a 6-by-180 bolt pattern and positive 90 mm offset. Its face uses a different design from the MR701.
Alternative To Compare
View On Amazon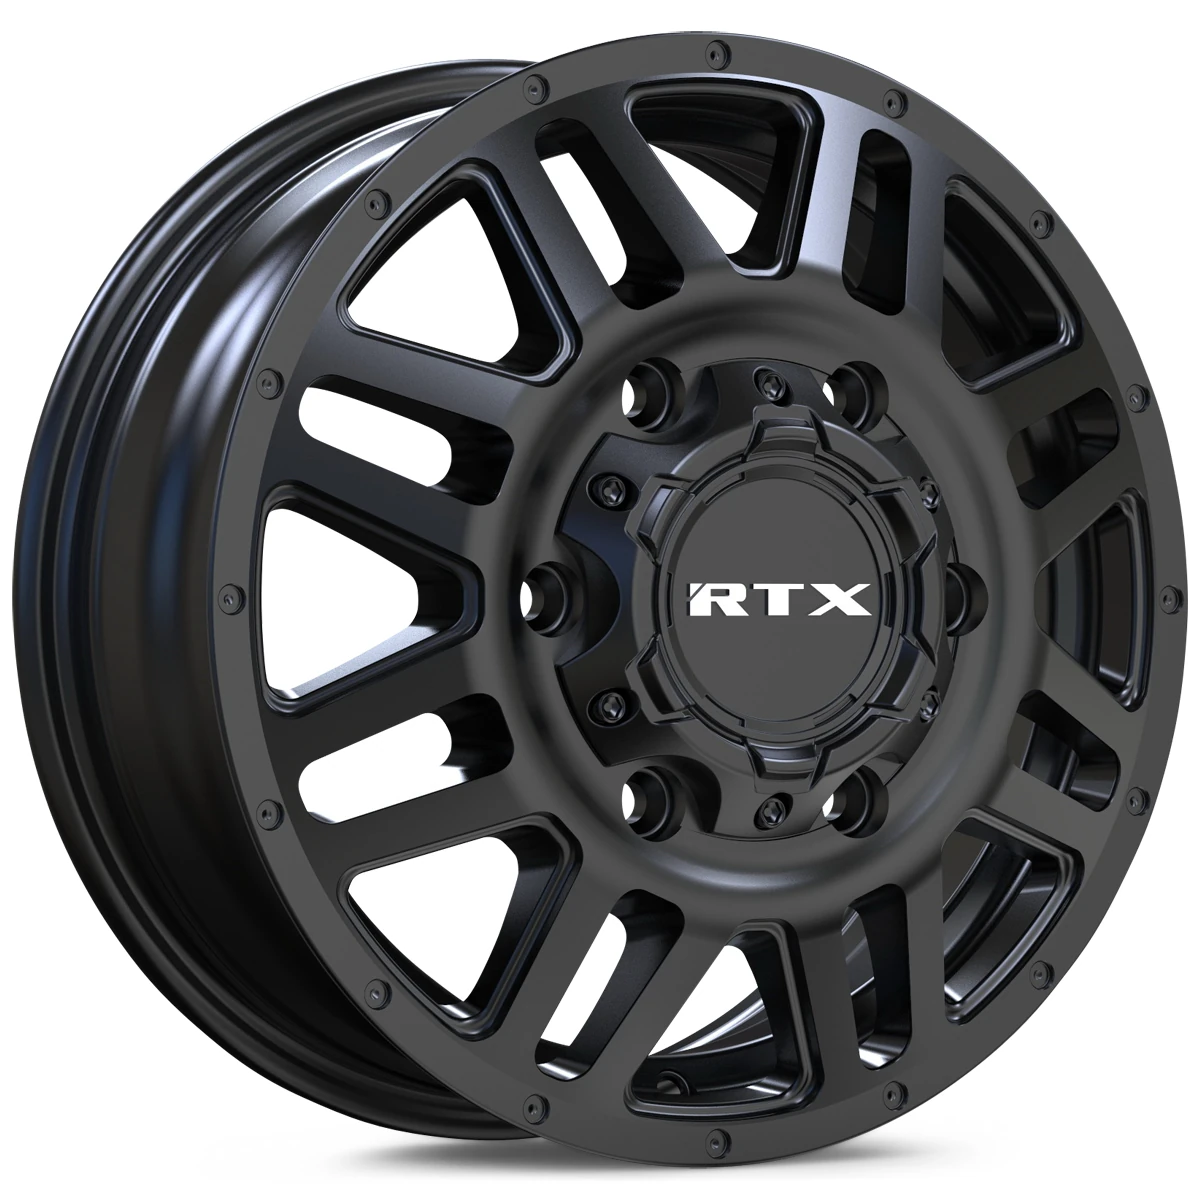
Rtx Adventure Satin-Black Wheel
The RTX Adventure listing specifies a satin-black 16-by-6-inch wheel with a 6-by-180 bolt pattern. Its listed positive 84 mm offset and 139 mm hub bore differ from the recorded MR701 configuration.
Alternative To Compare
View On AmazonBFGoodrich All-Terrain T/A KO2 Tires
I paired my Method wheels with BFGoodrich All-Terrain T/A KO2 tires. My tire purchase records are from Tire Rack and Discount Tire; the Amazon link below is a current purchase option.
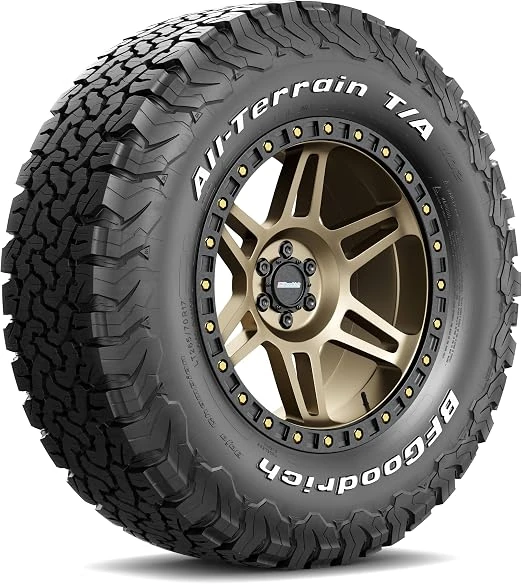
BFGoodrich All-Terrain T/A KO2 Tires
These are the KO2 tires used with my Method wheels. My retained tire purchase histories are from Tire Rack and Discount Tire; this Amazon link is a current purchase option.
Current Amazon Purchase Option
View On Amazon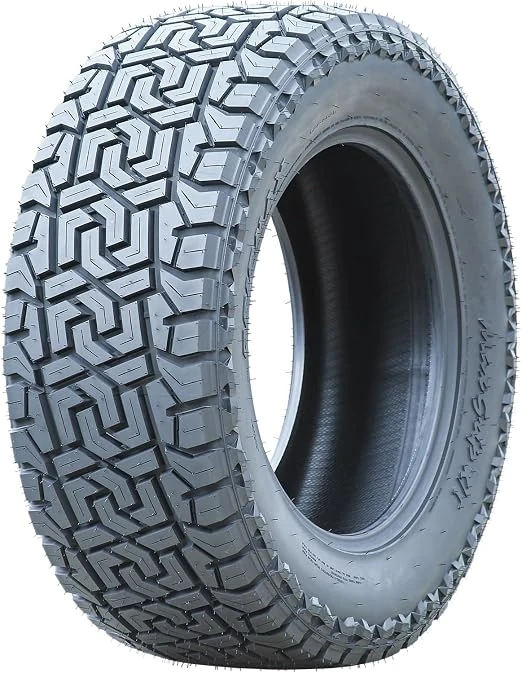
Gripmax MaxGrip X/T — Alternative
The Gripmax MaxGrip X/T is listed in LT255/70R16, load range E, with a 122/119S service description. Its tread uses large blocks and an open shoulder pattern.
Alternative To Compare
View On Amazon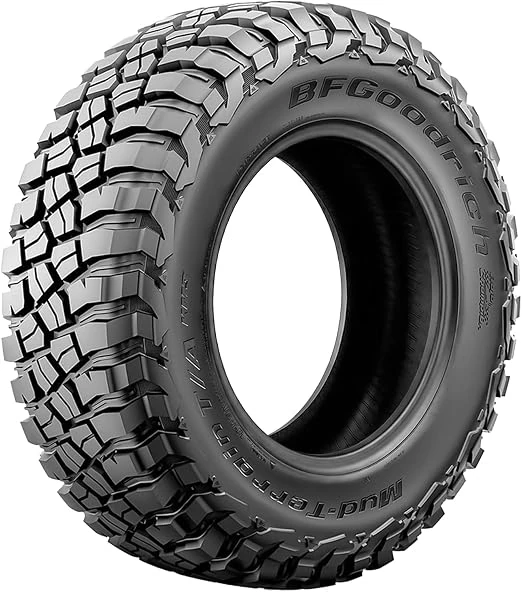
BFGoodrich Mud-Terrain T/A KM3 — Alternative
The BFGoodrich Mud-Terrain T/A KM3 is listed in LT255/70R16, load range E, with a 120/117Q service description. It uses a mud-terrain tread and has a Q speed symbol instead of the KO2’s S.
Alternative To Compare
View On AmazonThe Boxes, Shop Photographs and Walkaround Tell Different Parts
The Method MR701 introduction identifies the wheel family through my narration and packaging. The tire-shop photographs show the transition between the original setup and the installed result. The walkaround is where I show how the new assemblies look against the white body and dark lower trim. Looking at those records side by side is more useful to me than treating one finished photograph as the whole project.
Watch The Additional Finished Edit
Method Race Wheels MR701 + BFGoodrich All-Terrain T/A KO2 Tires on My 2023 Ford Transit — Landscape
Read This Video’s Spoken Transcript
Hello everyone. This is Steve. It's a beautiful day here in December in Phoenix, Arizona. I'm about to take my 2023 Ford Transit into the shop to get the wheels and tires changed. So I'm going to make a video about the stock wheels and tires and then show you what I'm changing them to. So here she is. These are the stock wheels and tires on my 2023 Transit.
And that's how they look. And so here are the wheels I'm going to be replacing them with. These are Method Race Wheels, matte black. It's the MR701s. So they've put the new tires and wheels on, and it's definitely a much better look. I'm quite happy with it. So if I go up close, you can see the larger off-road tires, the more aggressive-looking tread and the wheels.
And it's definitely an overall better look. And it's definitely an overall better look. So yes, I'm very, very happy with it.
Explore My Tires And Wheels Video Collection for the films, stage clips and viewing guide.
Questions from This Project
Which Clip Shows The Quickest Before-And-After?
The before-and-after clip puts the stock appearance and installed result into a short sequence. I use the full project film when I want the introduction and my reaction in the same viewing.
Where Do The Tire-Shop Photographs Fit?
They sit between the product introduction and the final walkaround in my written project story. They show the removed stock assemblies and the shop stage that connects the two appearances.
What Was My Recorded Takeaway?
I was pleased with the changed look. My account here follows that visual transformation, the Method introduction and my original reaction.